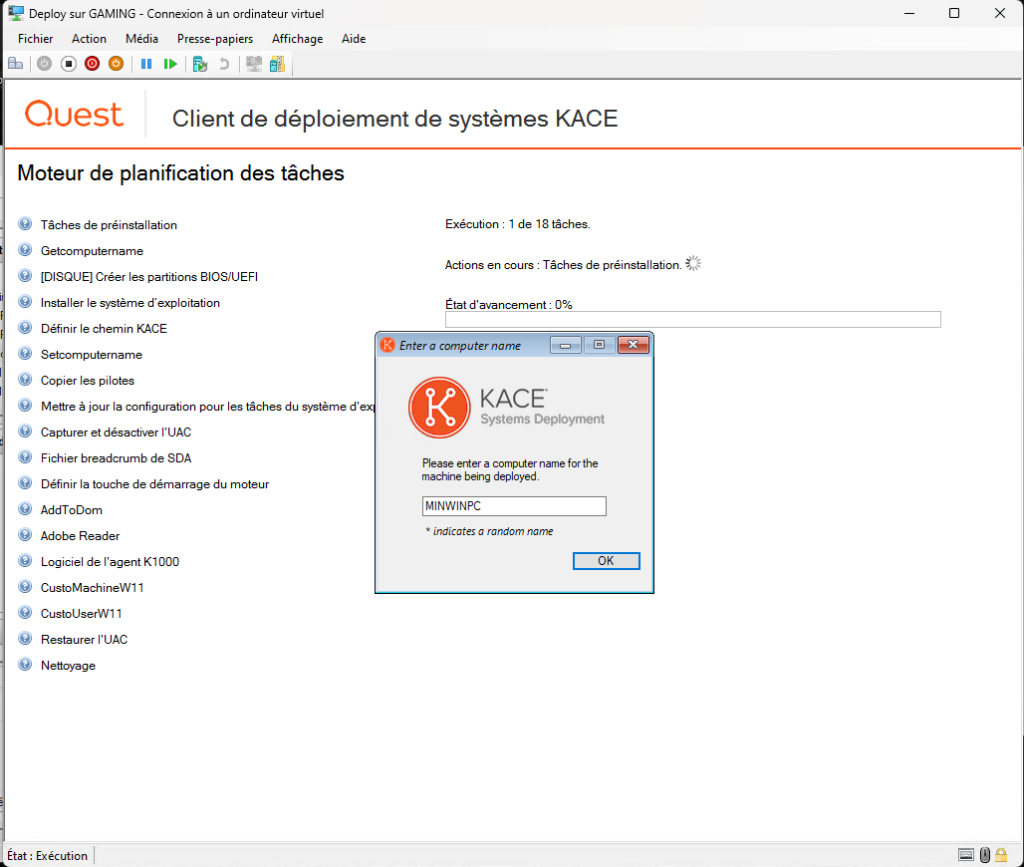
Automate Windows 11 Deployment with Quest SDA
Automate Windows 11 deployment with Quest SDA using scripted installations, PXE boot, Windows ADK, WinPE, driver management and post-installation tasks.
Automate Windows 11 Overview
WinPE
What to do: Create or refresh a WinPE environment compatible with SDA. Build WinPE using the Windows ADK (see next section) and then import it into the SDA appliance with Media Manager.
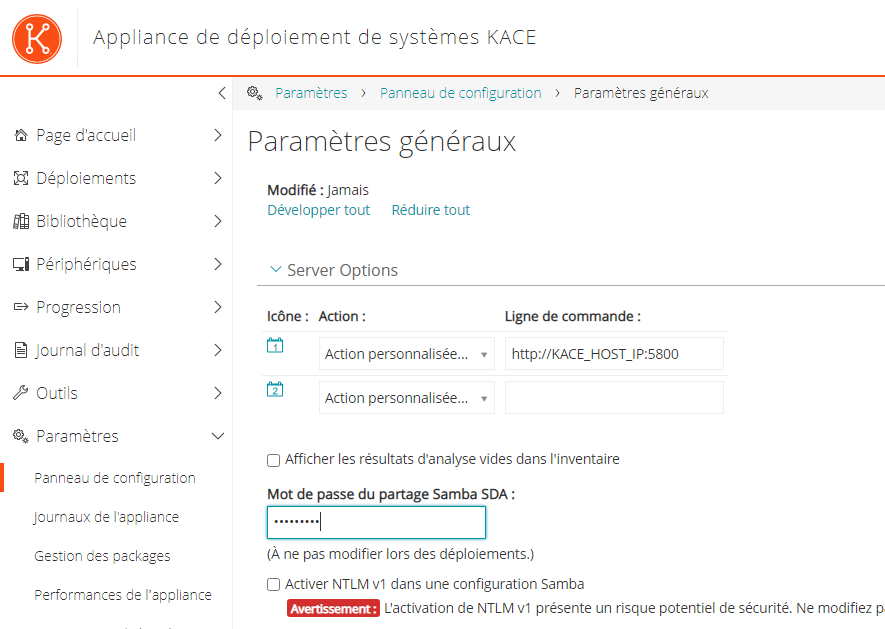
Samba Password
- On the appliance, open the Control Panel and set the Samba password in General Settings.
Driver Management
What to do: Centralize drivers by model/OS. Add them to the SDA driver library and assign them to the relevant scripted installs. Make sure storage, network, and chipset drivers are available at WinPE stage.
Automate Windows 11 Overview
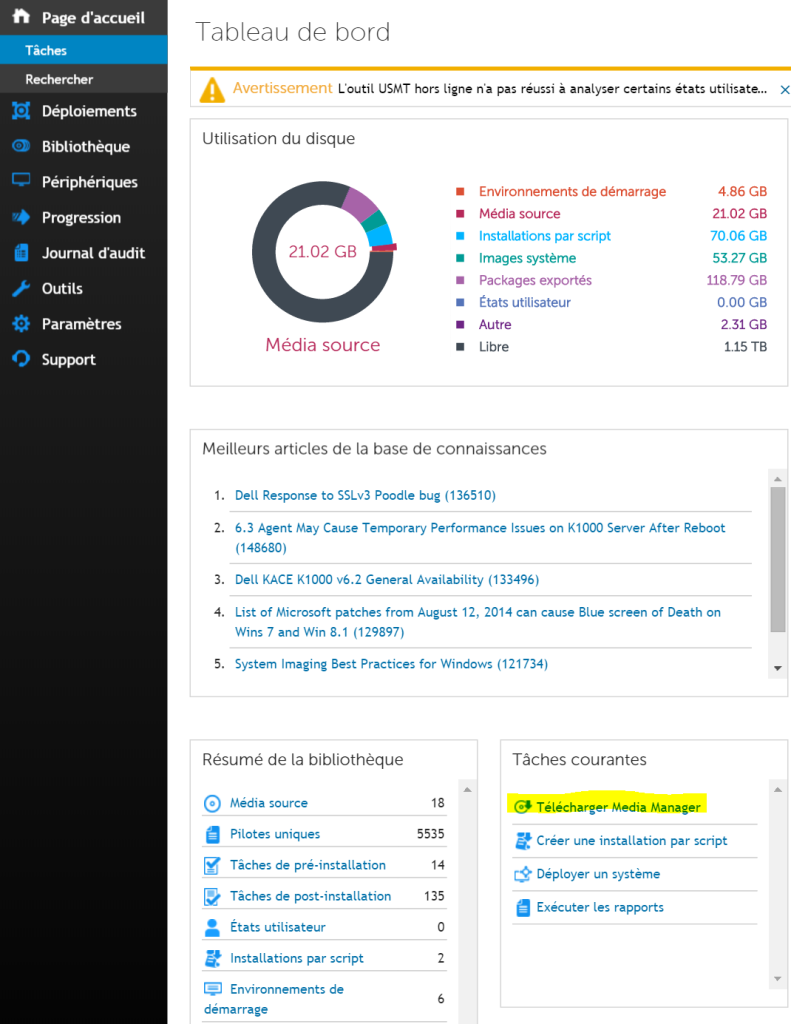
What to do: Install the Windows ADK (Deployment Tools) and the WinPE Add-ons on the workstation where you run SDA Media Manager. After each major Windows release, reinstall the matching ADK/WinPE version.
SDA Media Manager Installation
Note: Reinstall Media Manager after every new SDA version or patch.
- From the SDA web UI, download and install Media Manager on your admin workstation (where ADK/WinPE is installed).
Automate Windows 11 Overview
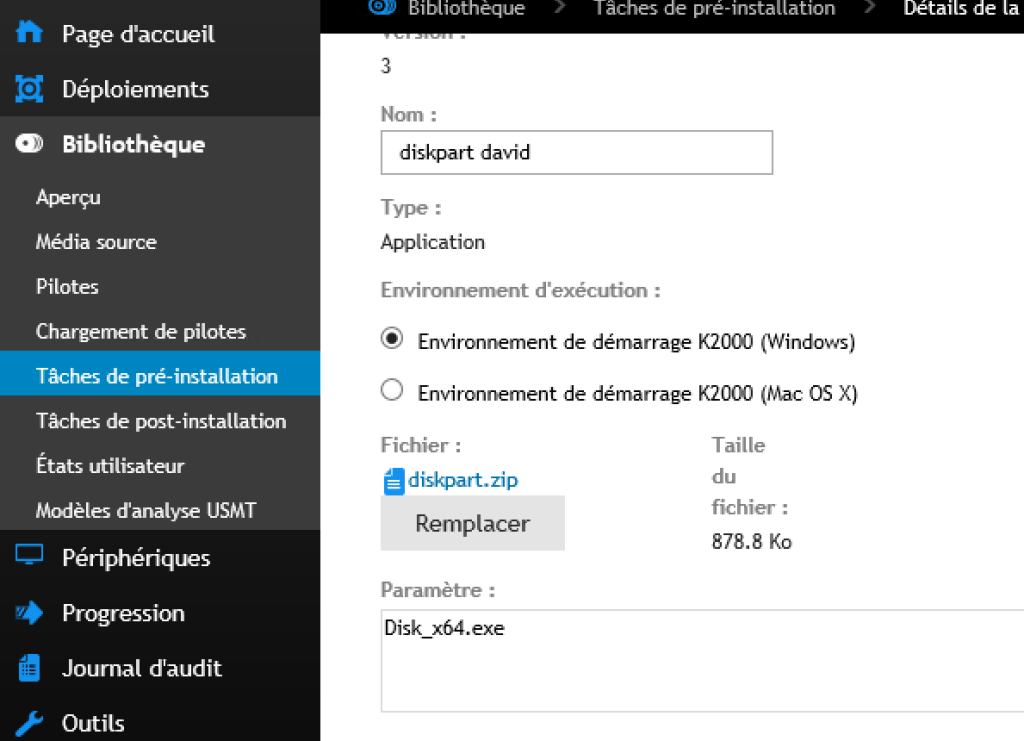
To handle Legacy BIOS vs UEFI automatically, use a script that detects the firmware type and calls the appropriate diskpart routine. Use this example:
Diskpart Script (GitHub) – Auto UEFI/Legacy
Warning: this example runs diskpart clean on disk 0. Use it only in a controlled Quest SDA deployment workflow.
Two possible executables:
Disk_x64.exefor 64-bit ISOsDisk_x86.exefor 32-bit ISOs
These small AutoIt tools detect the BIOS type using wpeutil UpdateBootInfo and read HKLMSystemCurrentControlSetControl. They then run the right diskpart file:
BIOS.txtUEFI.txt
You can edit those text files to match your partitioning standard.
Legacy BIOS example (single C partition):
select disk 0 clean create partition primary select partition 1 active assign exit UEFI example (single C partition):
select disk 0 clean convert gpt create partition efi size=100 format quick fs=fat32 label="System" assign letter="S" create partition msr size=128 create partition primary format quick fs=ntfs label="Windows" assign letter="C" - Adjust the two diskpart files before zipping, then create the Pre-Install task that calls the executable.
Automate Windows 11 Overview
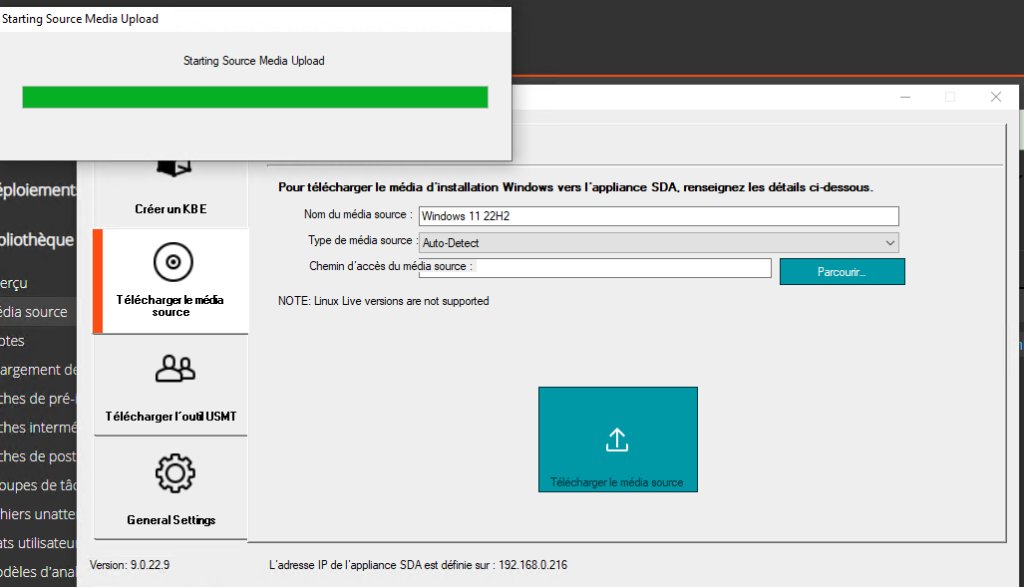
In KACE SDA Media Manager:
- Enter the appliance name and the Samba password.
- In the Download Windows Media tab, specify the Windows version (10 or 11) and the path to your customized media (for example, ISO with
NetFx3added).
Automate Windows 11 Overview
Note: Unlike Windows 10, on Windows 11 you must explicitly set the target
DiskIDandPartitionID. In the UEFI example above, Windows is onDiskID=0/PartitionID=3.
Replace in this example:
Password1➜ the local Administrator password you want.<LogonCount>1</LogonCount>➜ number of automatic sign-ins you want.leblogosd➜ your organization name.
<?xml version="1.0" encoding="utf-8"?> <unattend xmlns="urn:schemas-microsoft-com:unattend"> <settings pass="windowsPE"> <component xmlns:wcm="http://schemas.microsoft.com/WMIConfig/2002/State" name="Microsoft-Windows-Setup" processorArchitecture="amd64" publicKeyToken="31bf3856ad364e35" language="neutral" versionScope="nonSxS"> <ImageInstall> <OSImage> <WillShowUI>OnError</WillShowUI> <InstallTo> <DiskID>0</DiskID> <PartitionID>3</PartitionID> </InstallTo> </OSImage> </ImageInstall> <ComplianceCheck> <DisplayReport>OnError</DisplayReport> </ComplianceCheck> <UserData> <AcceptEula>true</AcceptEula> <ProductKey> <Key>W269N-WFGWX-YVC9B-4J6C9-T83GX</Key> </ProductKey> </UserData> </component> <component xmlns:wcm="http://schemas.microsoft.com/WMIConfig/2002/State" xmlns:xsi="http://www.w3.org/2001/XMLSchema-instance" name="Microsoft-Windows-International-Core-WinPE" processorArchitecture="amd64" publicKeyToken="31bf3856ad364e35" language="neutral" versionScope="nonSxS"> <SetupUILanguage> <UILanguage>en-US</UILanguage> </SetupUILanguage> <InputLocale>0409:00000409</InputLocale> <SystemLocale>fr-FR</SystemLocale> <UILanguage>fr-FR</UILanguage> <UserLocale>fr-FR</UserLocale> </component> </settings> <settings pass="generalize"> <component xmlns:wcm="http://schemas.microsoft.com/WMIConfig/2002/State" xmlns:xsi="http://www.w3.org/2001/XMLSchema-instance" name="Microsoft-Windows-Shell-Setup" processorArchitecture="amd64" publicKeyToken="31bf3856ad364e35" language="neutral" versionScope="nonSxS"> <DoNotCleanTaskBar>true</DoNotCleanTaskBar> </component> </settings> <settings pass="specialize"> <component xmlns:wcm="http://schemas.microsoft.com/WMIConfig/2002/State" name="Microsoft-Windows-UnattendedJoin" processorArchitecture="amd64" publicKeyToken="31bf3856ad364e35" language="neutral" versionScope="nonSxS"> <Identification> <JoinWorkgroup>WORKGROUP</JoinWorkgroup> </Identification> </component> <component xmlns:wcm="http://schemas.microsoft.com/WMIConfig/2002/State" name="Microsoft-Windows-Shell-Setup" processorArchitecture="amd64" publicKeyToken="31bf3856ad364e35" language="neutral" versionScope="nonSxS"> <ComputerName>*</ComputerName> <ProductKey>W269N-WFGWX-YVC9B-4J6C9-T83GX</ProductKey> <RegisteredOrganization>leblogosd</RegisteredOrganization> <RegisteredOwner>leblogosd</RegisteredOwner> <DoNotCleanTaskBar>true</DoNotCleanTaskBar> <TimeZone>Romance Standard Time</TimeZone> </component> <component xmlns:wcm="http://schemas.microsoft.com/WMIConfig/2002/State" xmlns:xsi="http://www.w3.org/2001/XMLSchema-instance" name="Microsoft-Windows-IE-InternetExplorer" processorArchitecture="amd64" publicKeyToken="31bf3856ad364e35" language="neutral" versionScope="nonSxS"> <Home_Page>about:blank</Home_Page> </component> <component xmlns:wcm="http://schemas.microsoft.com/WMIConfig/2002/State" xmlns:xsi="http://www.w3.org/2001/XMLSchema-instance" name="Microsoft-Windows-Deployment" processorArchitecture="amd64" publicKeyToken="31bf3856ad364e35" language="neutral" versionScope="nonSxS"> <RunSynchronous> <RunSynchronousCommand wcm:action="add"> <Description>EnableAdmin</Description> <Order>1</Order> <Path>cmd /c net user Administrator /active:yes</Path> </RunSynchronousCommand> <RunSynchronousCommand wcm:action="add"> <Description>UnfilterAdministratorToken</Description> <Order>2</Order> <Path>cmd /c reg add HKLMSOFTWAREMicrosoftWindowsCurrentVersionPoliciesSystem /v FilterAdministratorToken /t REG_DWORD /d 0 /f</Path> </RunSynchronousCommand> <RunSynchronousCommand wcm:action="add"> <Description>disable user account page</Description> <Order>3</Order> <Path>reg add HKLMSoftwareMicrosoftWindowsCurrentVersionSetupOOBE /v UnattendCreatedUser /t REG_DWORD /d 1 /f</Path> </RunSynchronousCommand> <RunSynchronousCommand wcm:action="add"> <Description>disable async RunOnce</Description> <Order>4</Order> <Path>reg add HKLMSoftwareMicrosoftWindowsCurrentVersionExplorer /v AsyncRunOnce /t REG_DWORD /d 0 /f</Path> </RunSynchronousCommand> </RunSynchronous> </component> <component xmlns:wcm="http://schemas.microsoft.com/WMIConfig/2002/State" xmlns:xsi="http://www.w3.org/2001/XMLSchema-instance" name="Microsoft-Windows-International-Core" processorArchitecture="amd64" publicKeyToken="31bf3856ad364e35" language="neutral" versionScope="nonSxS"> <InputLocale>040C:0000040C</InputLocale> <SystemLocale>fr-FR</SystemLocale> <UILanguage>fr-FR</UILanguage> <UserLocale>fr-FR</UserLocale> </component> <component xmlns:wcm="http://schemas.microsoft.com/WMIConfig/2002/State" xmlns:xsi="http://www.w3.org/2001/XMLSchema-instance" name="Microsoft-Windows-TapiSetup" processorArchitecture="amd64" publicKeyToken="31bf3856ad364e35" language="neutral" versionScope="nonSxS"> <TapiConfigured>0</TapiConfigured> <TapiUnattendLocation> <AreaCode>""</AreaCode> <CountryOrRegion>1</CountryOrRegion> <LongDistanceAccess>9</LongDistanceAccess> <OutsideAccess>9</OutsideAccess> <PulseOrToneDialing>1</PulseOrToneDialing> <DisableCallWaiting>""</DisableCallWaiting> <InternationalCarrierCode>""</InternationalCarrierCode> <LongDistanceCarrierCode>""</LongDistanceCarrierCode> <Name>Default</Name> </TapiUnattendLocation> </component> <component xmlns:wcm="http://schemas.microsoft.com/WMIConfig/2002/State" xmlns:xsi="http://www.w3.org/2001/XMLSchema-instance" name="Microsoft-Windows-SystemRestore-Main" processorArchitecture="amd64" publicKeyToken="31bf3856ad364e35" language="neutral" versionScope="nonSxS"> <DisableSR>1</DisableSR> </component> </settings> <settings pass="oobeSystem"> <component xmlns:wcm="http://schemas.microsoft.com/WMIConfig/2002/State" name="Microsoft-Windows-Shell-Setup" processorArchitecture="amd64" publicKeyToken="31bf3856ad364e35" language="neutral" versionScope="nonSxS"> <UserAccounts> <AdministratorPassword> <Value>Password1</Value> <PlainText>true</PlainText> </AdministratorPassword> </UserAccounts> <AutoLogon> <Enabled>true</Enabled> <Username>Administrator</Username> <Domain>.</Domain> <Password> <Value>Password1</Value> <PlainText>true</PlainText> </Password> <LogonCount>1</LogonCount> </AutoLogon> <OOBE> <HideEULAPage>true</HideEULAPage> <NetworkLocation>Work</NetworkLocation> <ProtectYourPC>1</ProtectYourPC> <HideLocalAccountScreen>true</HideLocalAccountScreen> <HideOnlineAccountScreens>true</HideOnlineAccountScreens> <HideWirelessSetupInOOBE>true</HideWirelessSetupInOOBE> </OOBE> <RegisteredOrganization>leblogosd</RegisteredOrganization> <RegisteredOwner>leblogosd</RegisteredOwner> <TimeZone>Romance Standard Time</TimeZone> </component> <component xmlns:wcm="http://schemas.microsoft.com/WMIConfig/2002/State" xmlns:xsi="http://www.w3.org/2001/XMLSchema-instance" name="Microsoft-Windows-International-Core" processorArchitecture="amd64" publicKeyToken="31bf3856ad364e35" language="neutral" versionScope="nonSxS"> <InputLocale>040C:0000040C</InputLocale> <SystemLocale>fr-FR</SystemLocale> <UILanguage>fr-FR</UILanguage> <UserLocale>fr-FR</UserLocale> </component> </settings> <settings pass="offlineServicing"> <component xmlns:wcm="http://schemas.microsoft.com/WMIConfig/2002/State" xmlns:xsi="http://www.w3.org/2001/XMLSchema-instance" name="Microsoft-Windows-PnpCustomizationsNonWinPE" processorArchitecture="amd64" publicKeyToken="31bf3856ad364e35" language="neutral" versionScope="nonSxS"> <DriverPaths> <PathAndCredentials wcm:keyValue="1" wcm:action="add"> <Path>Drivers</Path> </PathAndCredentials> </DriverPaths> </component> </settings> </unattend> Automate Windows 11 Overview
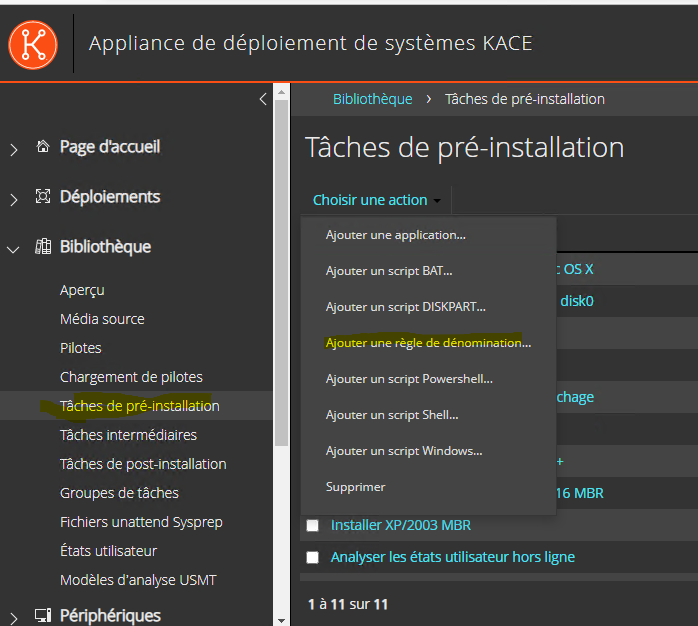
In the Pre-Installation Tasks:
- Add a naming rule.
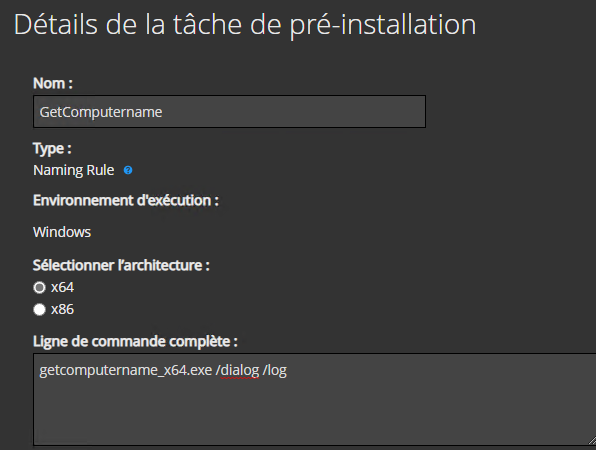
- Change the command line to: GetComputerName_x64.exe /dialog /log
Automate Windows 11 Overview
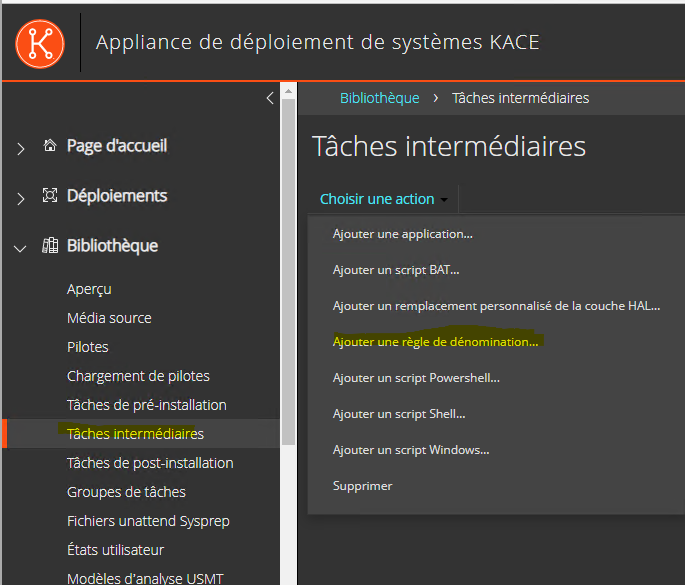
In the Mid-Level Tasks:
- Add the naming rule that applies the previously captured name.
Automate Windows 11 Overview
- In Post-Installation Tasks, create a program to install the SMA agent.
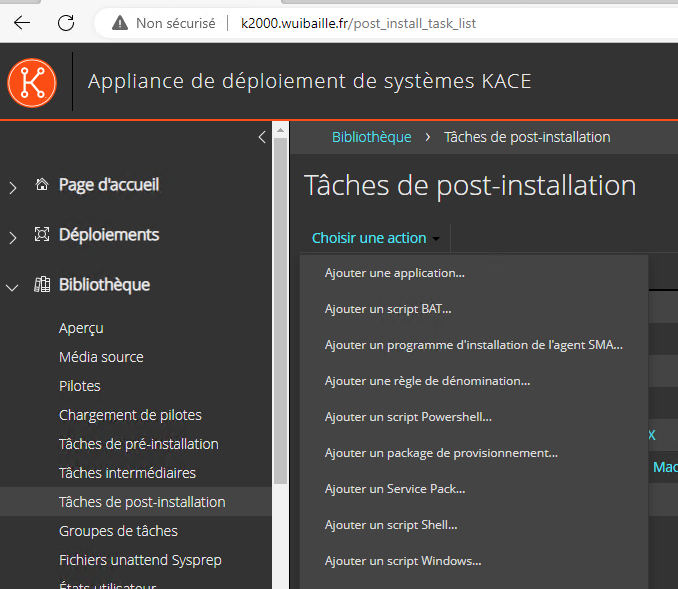
- Add the MSI found at
k1000clientagent_provisioningwindows_platform.
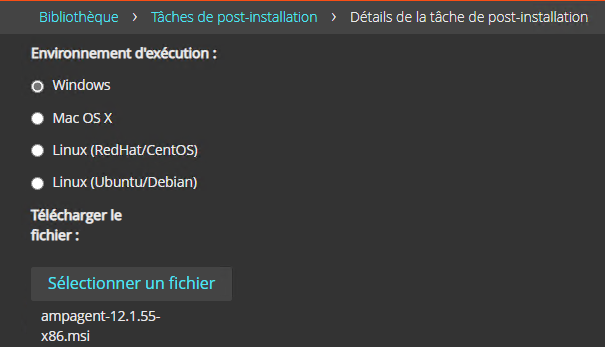
- Change the install command to include the SMA server name and an enrollment token.

Automate Windows 11 Overview
Using Adobe Reader as an example (same approach for other apps):
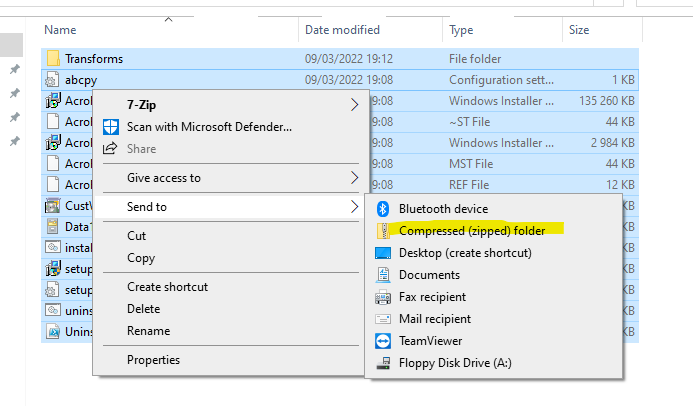
- Zip your application sources. Ready-to-use sample:
- In Post-Installation Tasks, add an application.
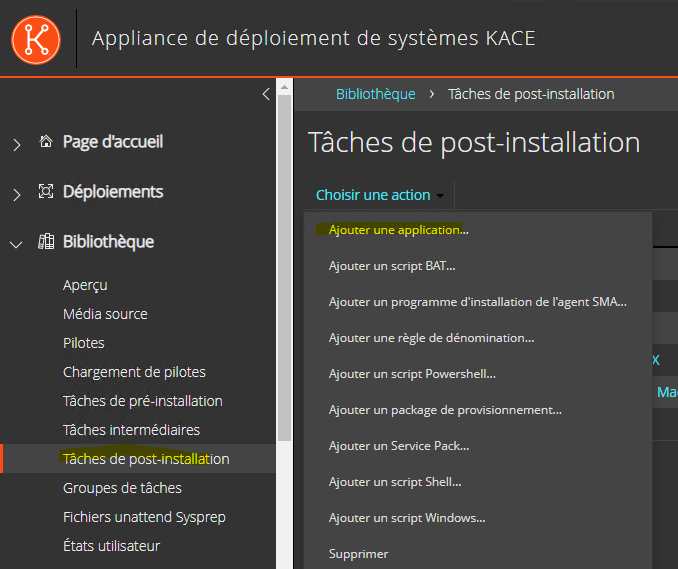
- Add the installation sources (your ZIP).
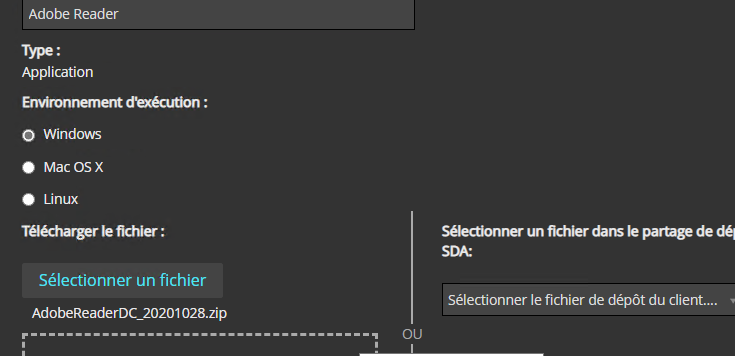
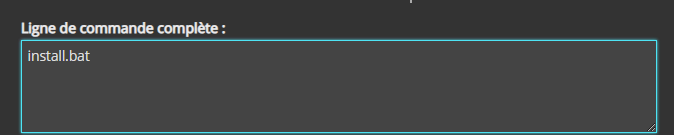
- Set the install command (e.g.,
install.bat).
Automate Windows 11 Overview
Creating a New Scripted Installation
- In Deployments, select Scripted Install.
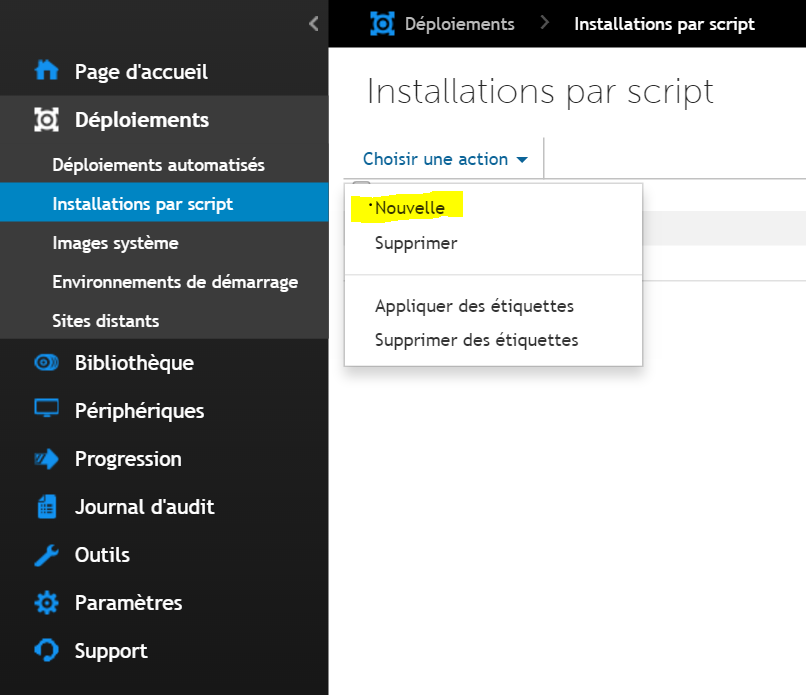
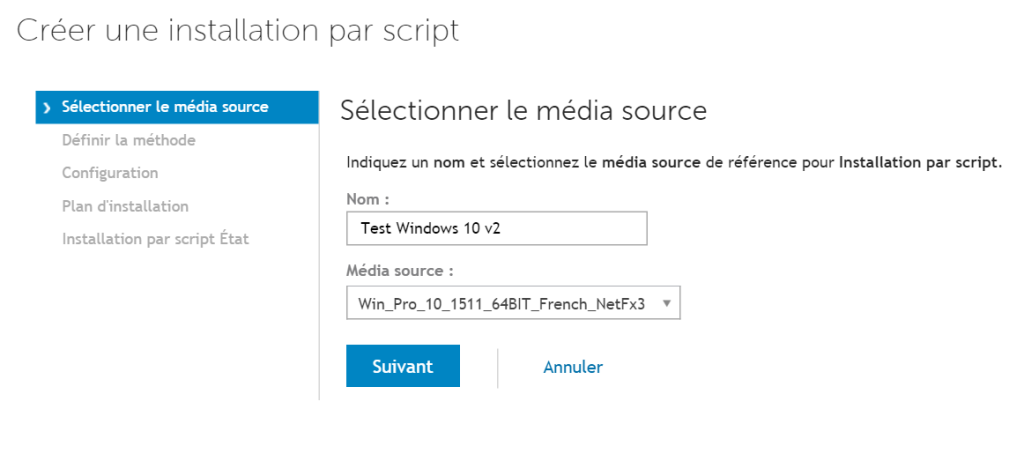
- Enter the installation name.
- Specify the Windows ISO name (10/11).
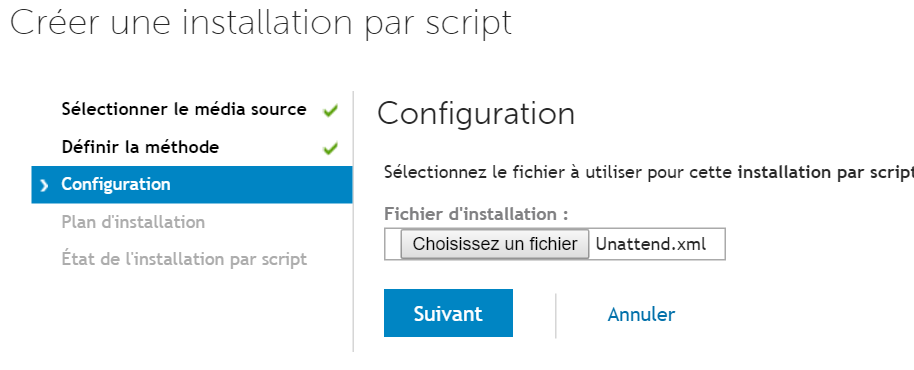
- Use a custom answer file.
- Provide the path to your
unattend.xml.
Complete unattend sample: windows-10-x64-unattend on GitHub
Adding Tasks
- Add the Pre-Install tasks (diskpart/naming), Mid-Level tasks (SetComputerName), and Post-Install tasks (agent, apps).



- Save/validate.
Once the task is ready, you can deploy Windows 10/11.
Automate Windows 11 Overview
- PXE-boot and choose Scripted Install.
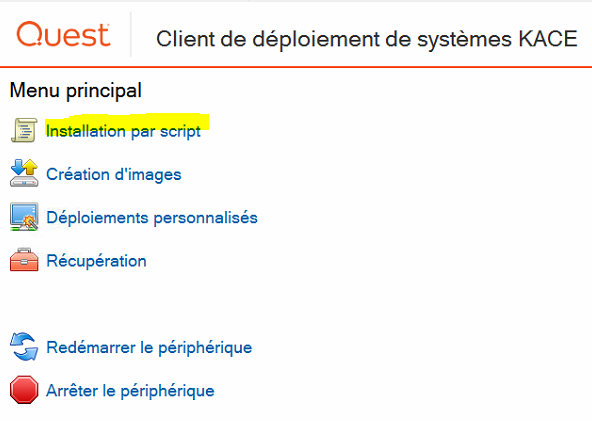
- Select your scripted installation.
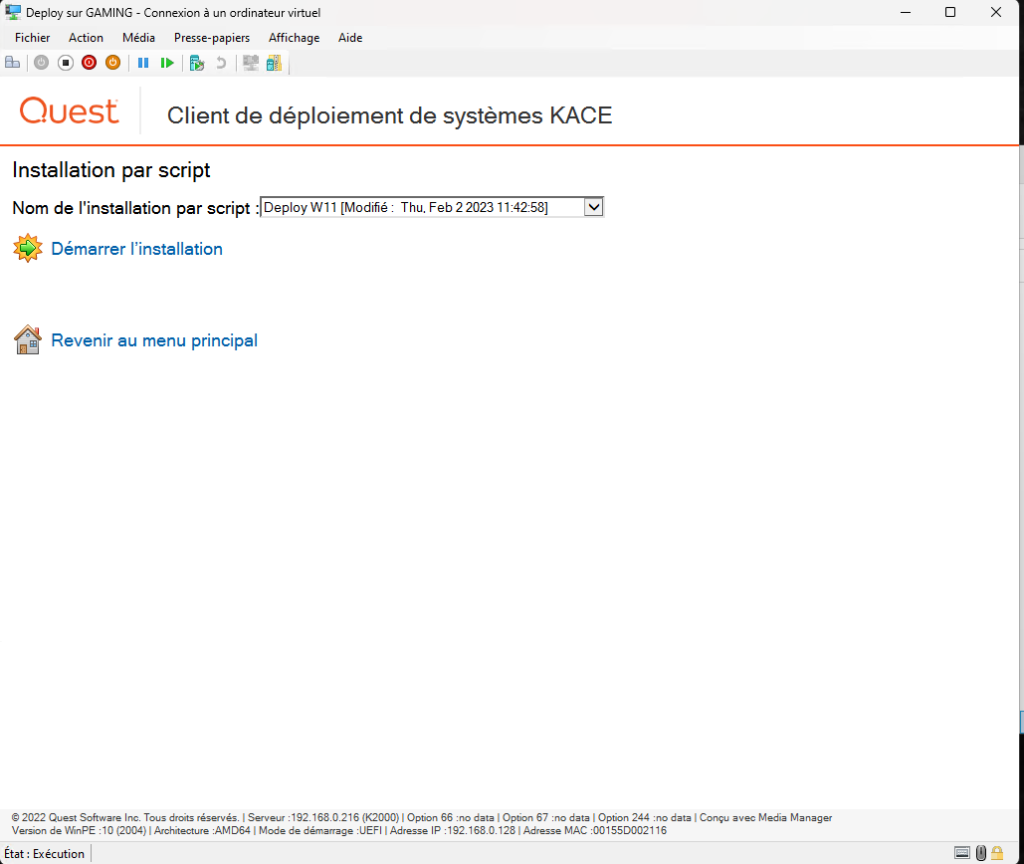
- The installation starts.