
Install and Configure Quest SMA Appliances
Install Configure Quest – Install and configure Quest SMA appliances, including virtual or physical appliance setup, network configuration, agent deployment, firewall settings, backups and inventory.
Install Configure Quest – Installation and Configuration of SMA Appliances
- Download Link
- Physical / VMware / HyperV Configuration
- Network Configuration
- IP / Account Configuration
- Agent Installation
- Backup
Appliances
Virtual Appliance
Download
Install Configure Quest – Download links are available on the Favorites page (KACE account required).
Prerequisites
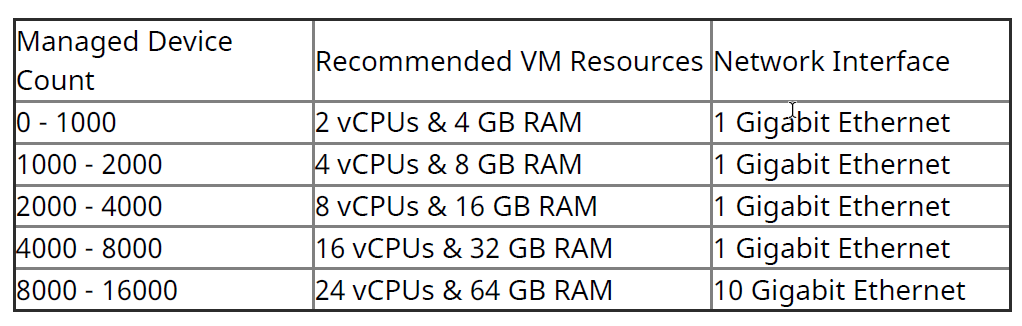
Physical Appliance
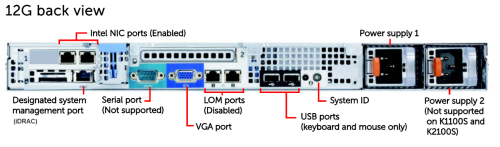
Install Configure Quest – If you have chosen physical appliances, here is a KACE article on configuring iDRAC cards: idrac-for-k-appliances
Install Configure Quest – With a diagram of the appliances:
Network Configuration
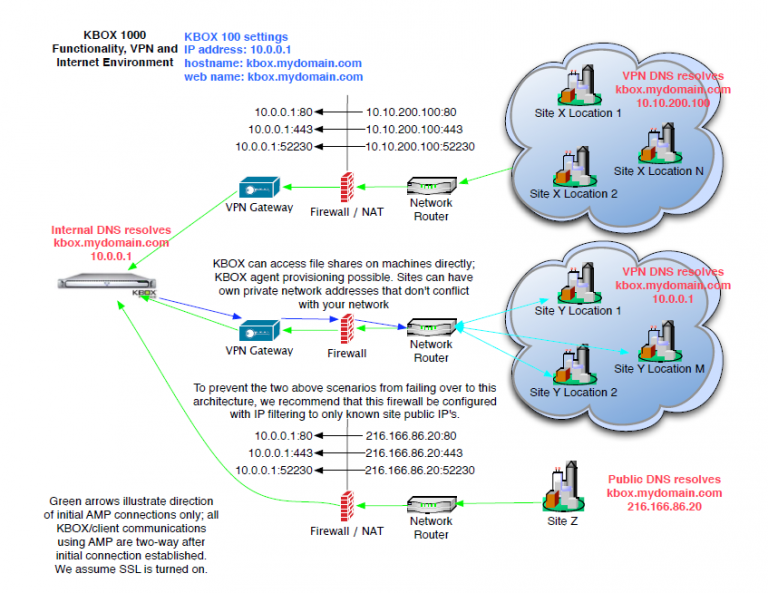
Install Configure Quest – The appliance can be used on the LAN as well as on the Internet with a NAT rule. To do this, you will need to resolve the DNS name of the appliance:
- With the internal IP address on the LAN. Example: K1000.mydomain.com = 10.0.3.1
- With the internet address on the WAN. Example: K1000.mydomain.com = 174.45.32.21
Firewall Opening
Install Configure Quest – Sources: kb 111775
Install Configure Quest – Sources: k1000-appliance
Install Configure Quest – Below are the URLs used to update patch listings, K1000 software updates, OVAL, SCAP, Dell warranty, and Dell updates. Please whitelist these in your firewall for ports 80 and 443 (HTTP/HTTPS):
Install Configure Quest – For K1000 Functionality (required), this includes the following URLs:
- service.kace.com
- servicecdn.kace.com
- www.kace.com
- www.appdeploy.com
- software.dell.com
- ftp.dell.com
- downloads.dell.com
Install Configure Quest – For K1000 Patching Functionality (required), this includes the following URLs:
- kace.cdn.lumension.com
- cache.patchlinksecure.net
- cache.lumension.com
Install Configure Quest – For Microsoft Windows content, this includes the following URLs:
- go.microsoft.com
- download.windowsupdate.com
- www.download.windowsupdate.com
- download.skype.com
- download.microsoft.com
- wsus.ds.download.windowsupdate.com
Install Configure Quest – For Adobe application content, this includes the following URLs:
- ardownload.adobe.com
- armdl.adobe.com
- download.adobe.com
- swupdl.adobe.com
- www.adobe.com
Install Configure Quest – For Mozilla Firefox, this includes the following URL:
- ftp.mozilla.org
Install Configure Quest – For Ultra VNC, this includes the following URL:
- support1.uvnc.com
Install Configure Quest – For 7-Zip, this includes the following URL:
- downloads.sourceforge.net
Install Configure Quest – For VideoLAN VLC, this includes the following URL:
- download.videolan.org
Configuration
The URLs
Install Configure Quest – http://k1000 => For users
Install Configure Quest – http://k1000/admin => For admins for K1100 and K1200
Install Configure Quest – http://k1000/system => For admins for K1200
Step 1: Create DNS Name
Install Configure Quest – On your DNS server, create a DNS alias for the K1000 appliance. The DNS (ALIAS) name will then be used for:
- Specifying the appliance name
- Accessing the console
- Installing KACE agents
Install Configure Quest – Note: The following steps mention the name K1000 as the DNS name. Replace it with your DNS name.
Step 2: From the Appliance Console
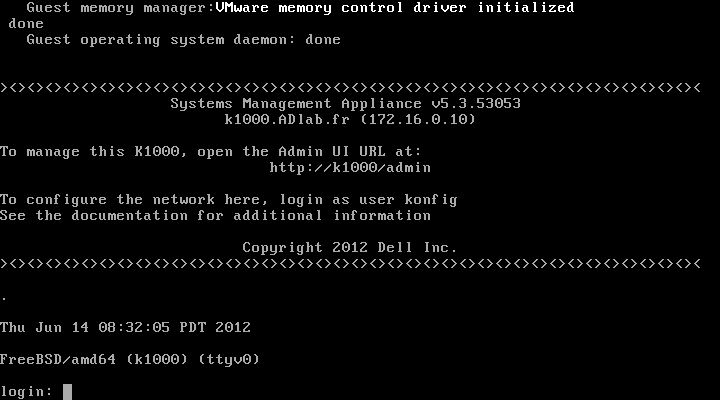
- When starting the platform, use the following native KACE account to configure the platform:
- Login: konfig
- Password: konfig
- At this point, the platform prompts the administrator to enter essential information for its proper functioning on the target network.
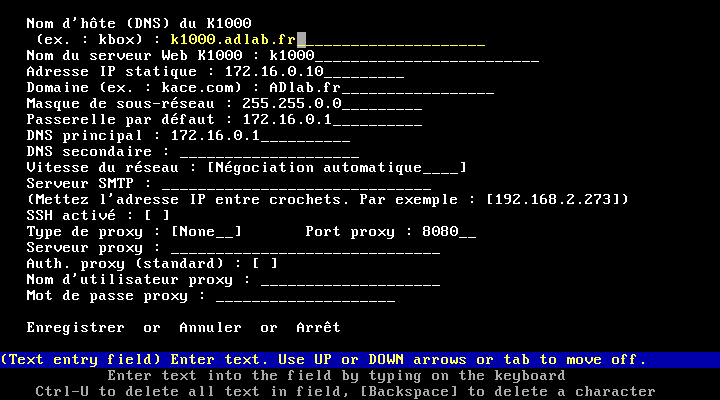
- Once the fields are filled in and saved, the platform automatically restarts to finalize its internal configuration:
- Upon restart, the successful validation of the entered information is displayed:
Step 3: From the Web Console
- From this point, access the platform via the following address:
Install Configure Quest – http://k1000/admin (or http://k1000/system)
- The first page the DELL platform directs you to is the initial configuration page:
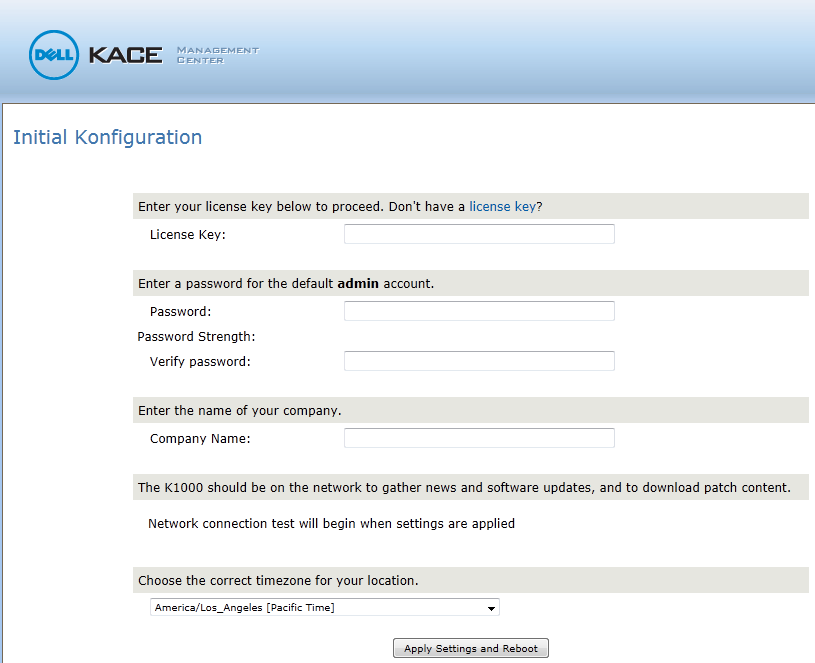
- Therefore, configure the first necessary information for the platform to function properly:
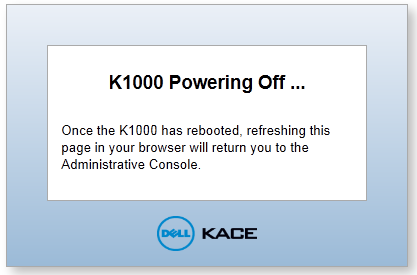
- Once the initial configuration is applied, the KBOX K1000 restarts:
- Once the K1000 platform has restarted, the KBOX administrator account authentication portal appears:
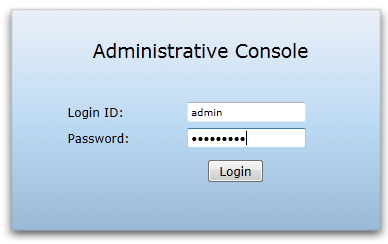
- After the first authentication on the platform via the address: http://k1000/admin
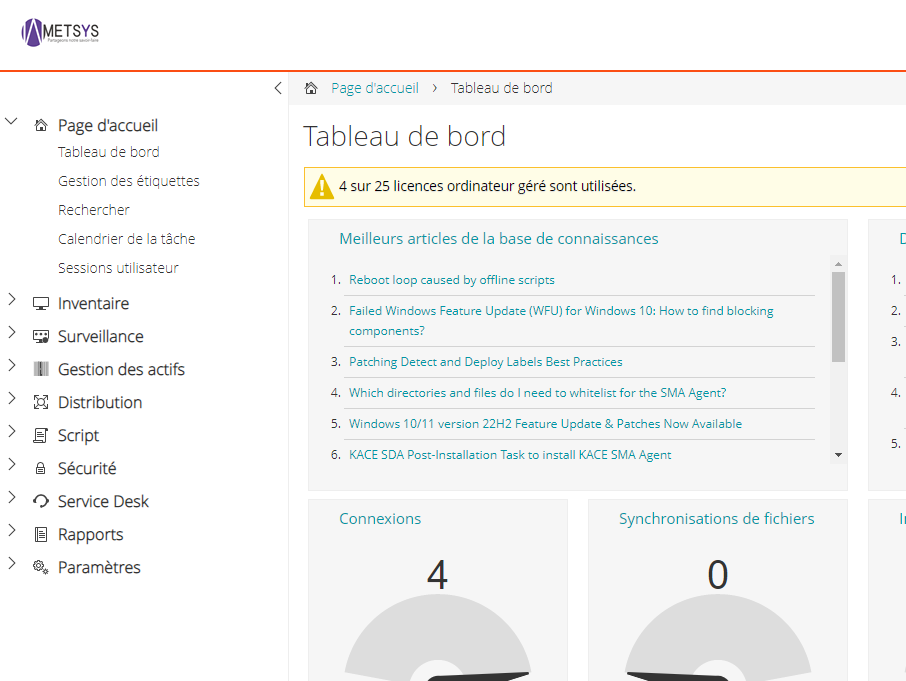
- We arrive at the first home page of the KBOX portal:
Deploying Agents
Introduction
Install Configure Quest – Once the appliance is online, you can deploy KACE agents on the workstations.
- Manual Installation
- Push Mode, which consists of pushing the agents from the appliance.
Install Configure Quest – This method requires too many prerequisites on the workstations for it to be functional (UAC disabled, simple sharing disabled, etc.).
- Via GPO
Prerequisite: Samba
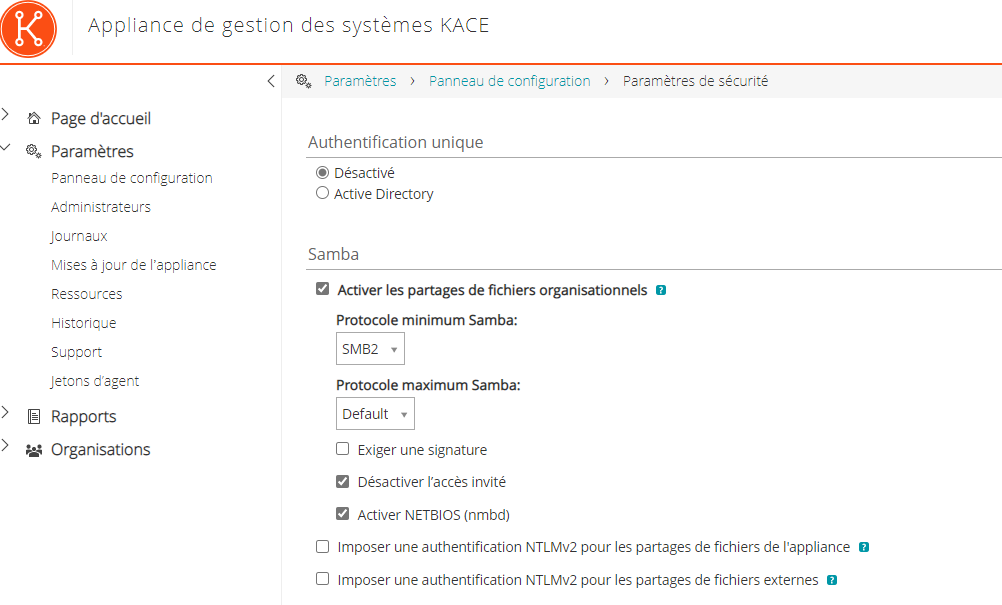
Install Configure Quest – Enable Samba sharing to access the agent installation sources.
- In the control panel, enable file sharing (Organization level for K1200)
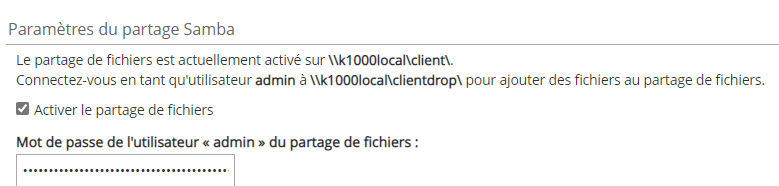
- Enable Samba sharing and set the password (K1100 and K1200)
- The account to use is “admin”. You can type .admin if your workstation is in a domain.
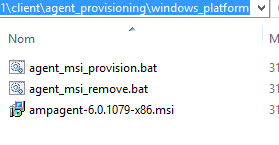
- The MSI agent is available on the appliance share (k1000clientagent_provisioningWindows_platform)
Install Configure Quest – You will need to create a token on the appliance:
Prerequisite: Token
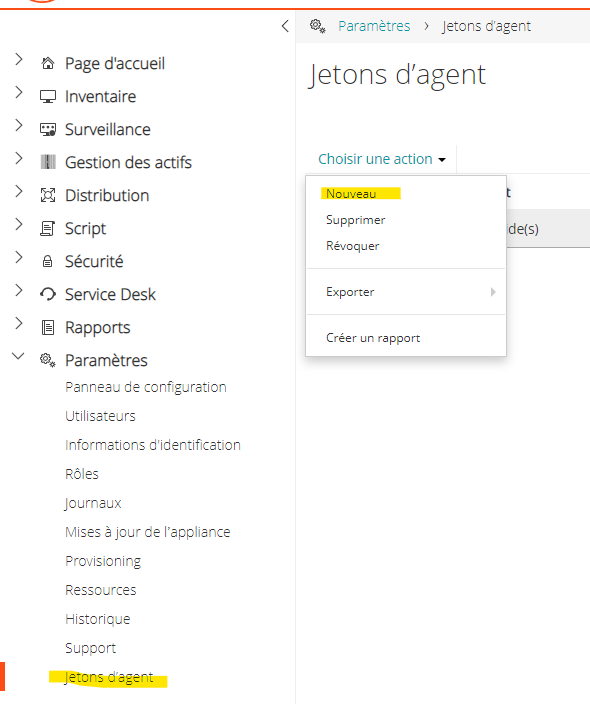
- In Settings Agent Token
- Create a new token
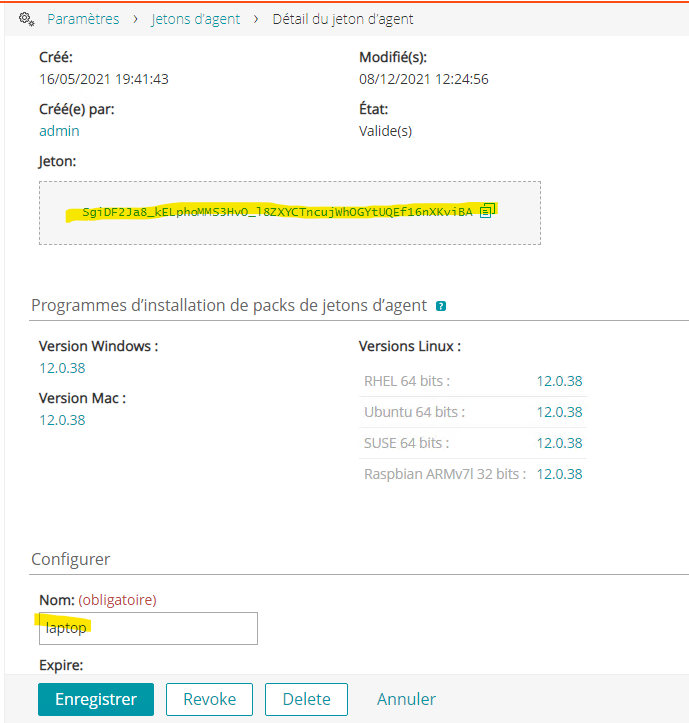
- Enter the name and copy the GUID for later use
Manual Installation
Install Configure Quest – You can perform a manual installation to test the appliance, for example.
Install Configure Quest – There are two options:
Renaming the MSI
Install Configure Quest – Rename the MSI as follows:
ampagent-11.0.119-x86_HOST+TOKEN.msi

Example: ampagent-11.0.119-x86_k1000.kace.com+SgiDF2Ja8_kELphoMMS3HvO_l8ZXYCTncujWhOGYtUQEf16nXKviBA.msi
Passing Arguments to the MSI
msiexec /i ampagent-11.0.119-x86.msi /qn HOST=<appliance_hostname> TOKEN=<agent_token>
Install Configure Quest – Copy
GPO Installation with KACE Provisioning Tools
Install Configure Quest – K1000 version 6.x comes with a new tool for creating a GPO to deploy the KACE agent.
Install Configure Quest – Prerequisite: To function, the MSI must be copied to a Windows share with read permissions for domain computers (the simplest is to give read permissions to “Authenticated Users,” which includes users and domain computers).
Install Configure Quest – Download
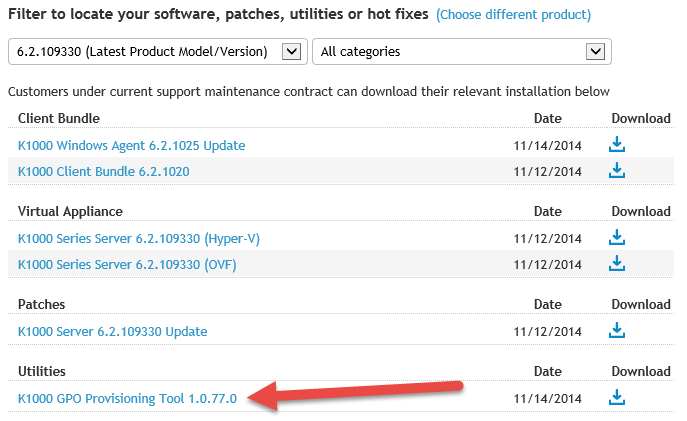
- On a workstation with
- Installed administration tools (recommended)
- A domain admin account (for GPO creation)
- Download and install the tool
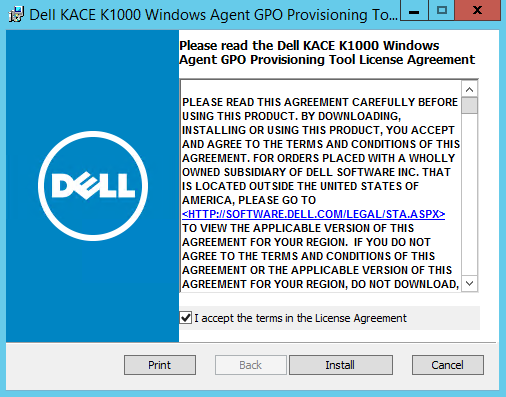
- Then launch the tool
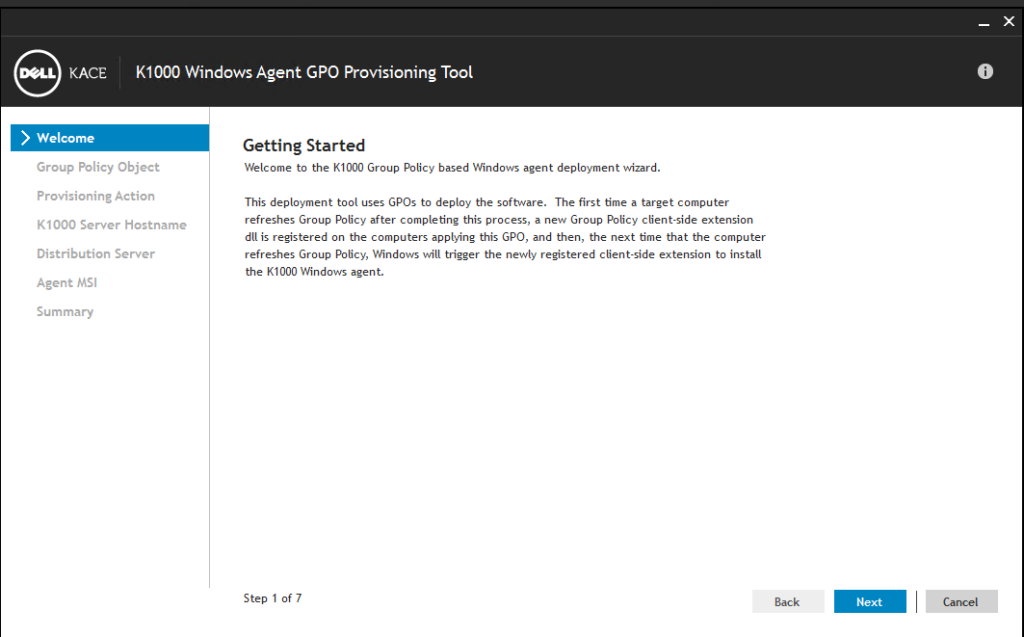
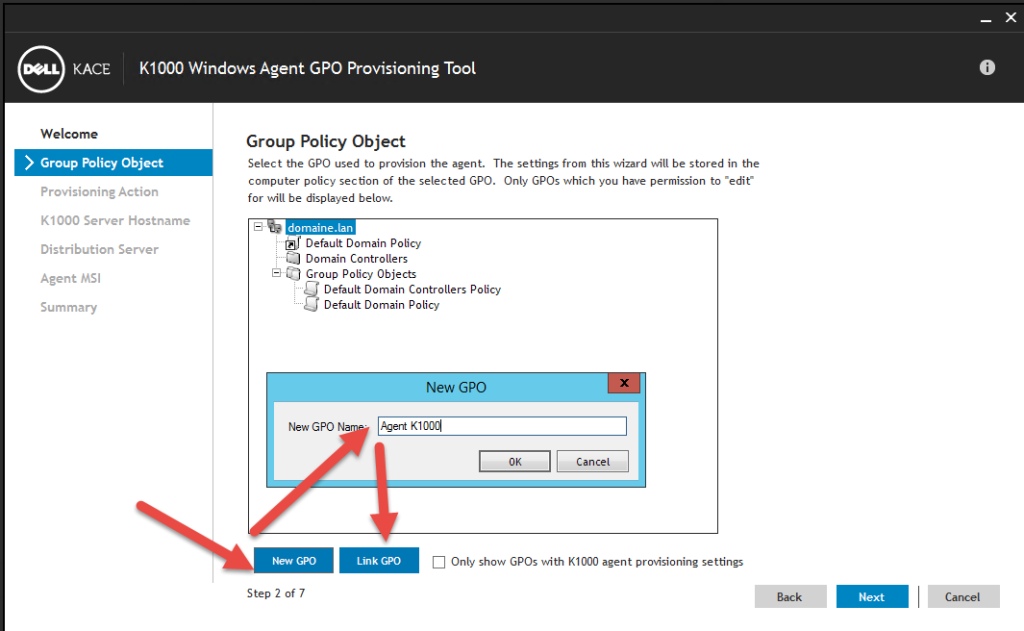
- Create a new GPO and link it to an existing OU (where the workstations are located)
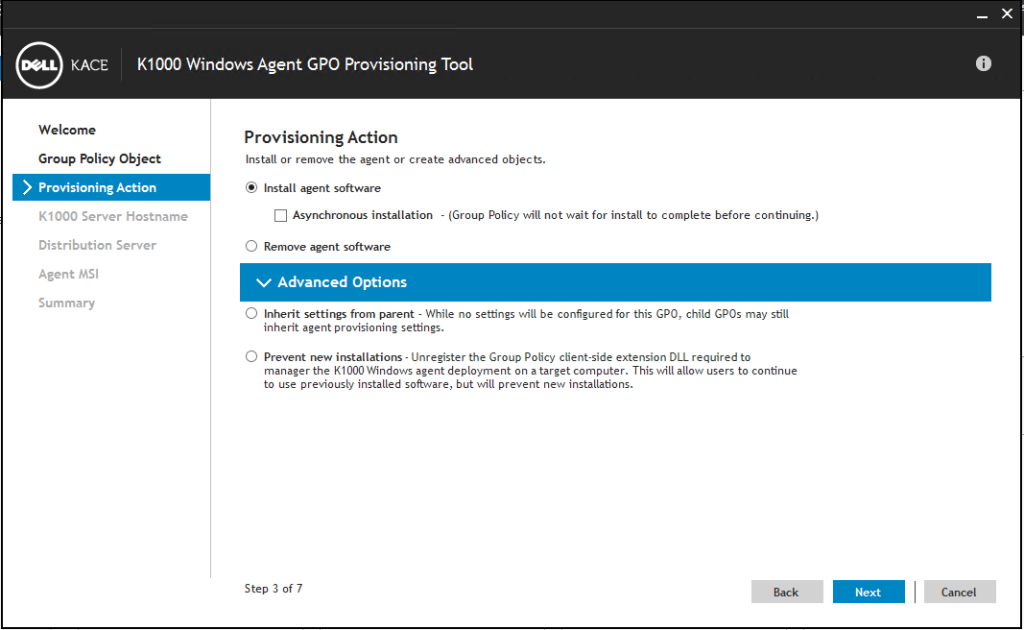
- Select the option to install the KACE agent
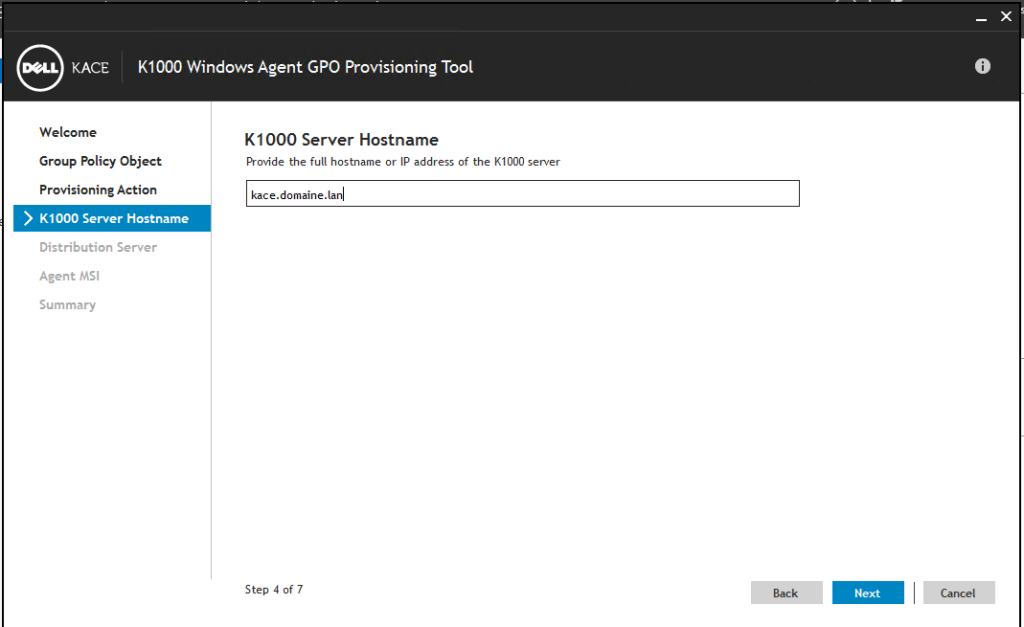
- Enter the KACE server name
- Enter a share containing the MSI and the name of the MSI
Install Configure Quest – Note: Since 2008 R2, you can no longer use (not recommended) the netlogon for installations.
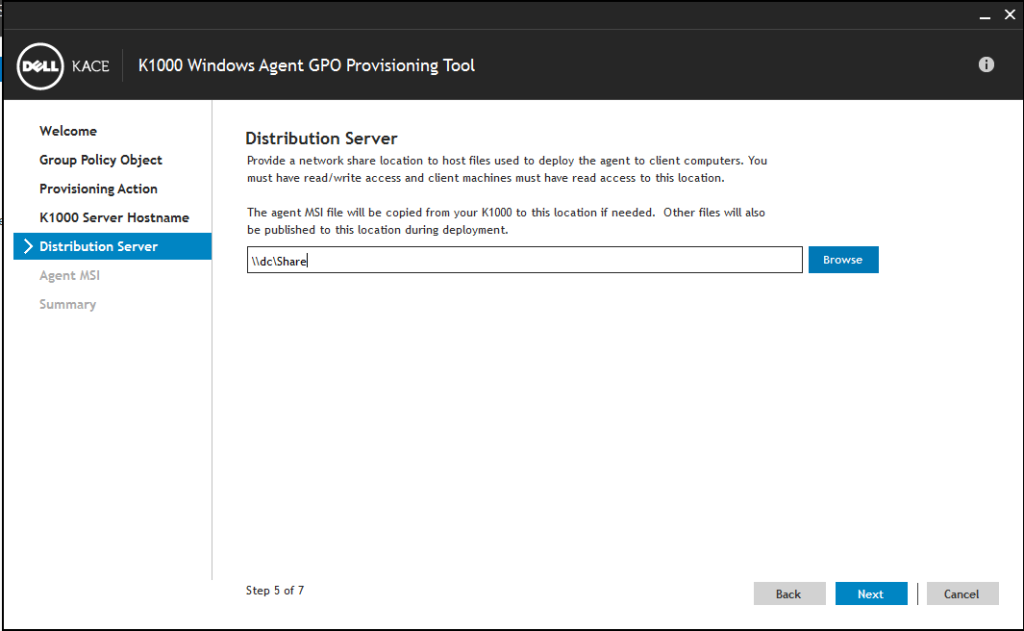
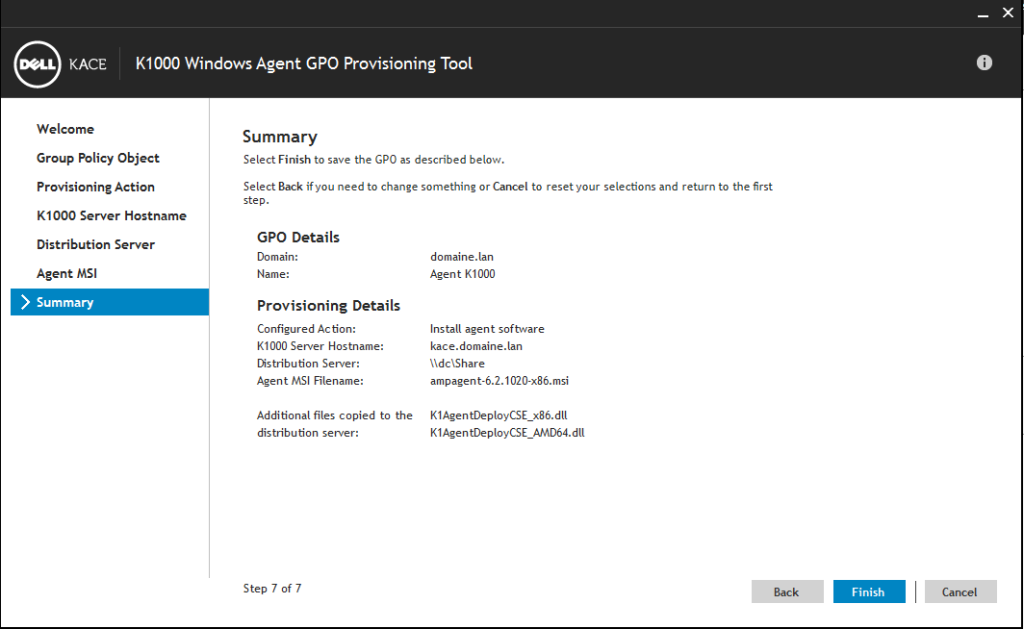
- Validate the summary
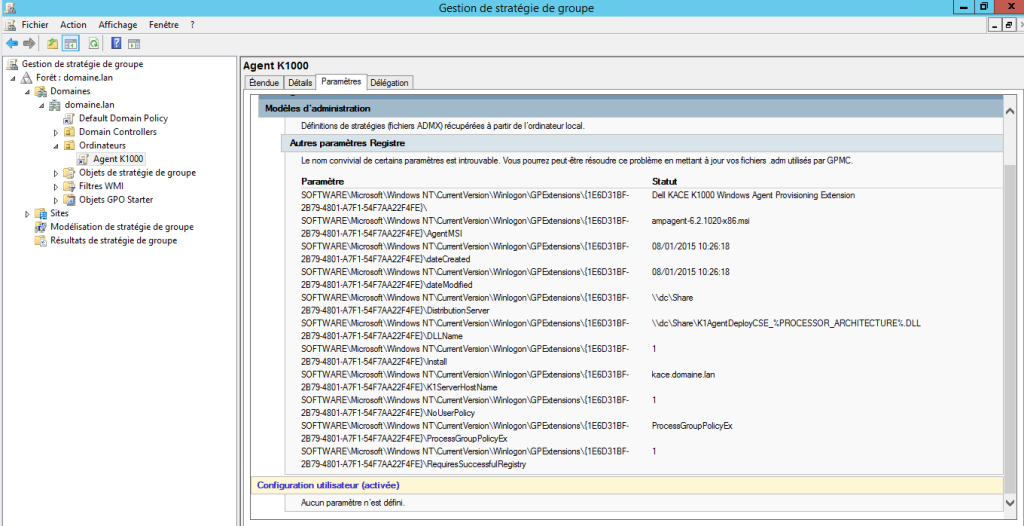
- If you open the GPO, you can see the details
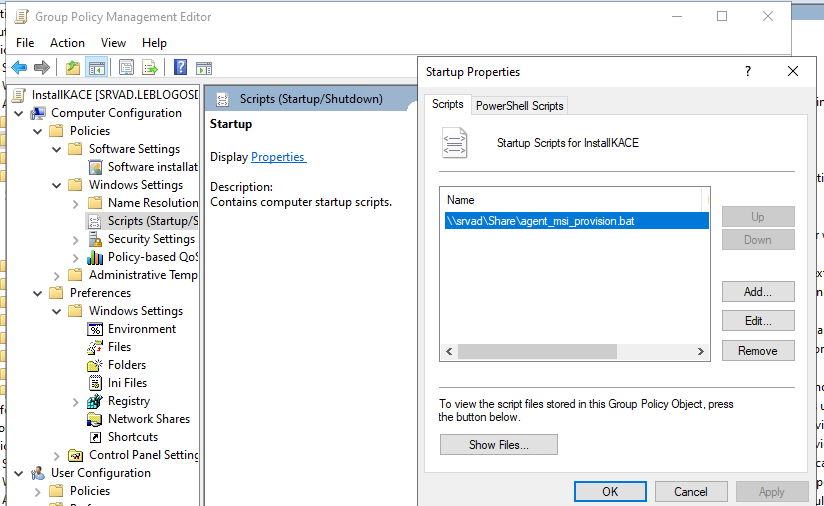
GPO Installation with agent_msi_provision.bat
Install Configure Quest – You can also create a computer GPO using the agent_msi_provision.bat script directly on the K1000 client share.
Install Configure Quest – I no longer use the bat directly, but I copy it to a Windows share with some small changes (directly set variables).
@echo off

REM    Copyright 2020 Quest Software, Inc.
REM    All rights reserved.
REM
REM    File: agent_msi_provision.bat
REM
REM    This bat installs the KACE SMA Agent.


echo [MSGCODE: 000] Begin agent_msi_provision.bat processing.

set KBOX_SERVER=k1000.leblogosd.lan
set INSTALLER=srvad.leblogosd.lanShareampagent-12.0.38-x86.msi
set TOKEN=80gyuILcgllEh2kiXD-_RbmmiRURgO7660tBief8tm6OJ88nOzmykQ

REM Change working dir to temp
cd %windir%temp

REM Detect correct Program Files folder. Note this batch file may run in 32-bit env (SysWOW64/cmd.exe)
REM So %ProgramFiles% might be Program Files (x86), but we always want to check the regular Program Files.
set K64=no
if "%ProgramFiles(x86)%" == "" echo [MSGCODE: 032] Detected 32-bit platform.
if "%ProgramFiles(x86)%" == "" goto on32Bit
  set K64=yes
echo [MSGCODE: 064] Detected 64-bit platform.
:on32Bit

REM Just use the ProgramFiles
REM set KProgramFiles=%ProgramFiles%

:: Set KProgramFiles to 32-bit dir on x64
SET KProgramFiles=%ProgramFiles(x86)%
IF NOT EXIST "%KProgramFiles%" SET KProgramFiles=%ProgramFiles%
:: Set KSystem32 to 32-bit dir on x64
SET KSystem32=%SystemRoot%SysWOW64
IF NOT EXIST %KSystem32% SET KSystem32=%SystemRoot%System32

REM Detect if 5.2 (or later) agent already installed, if so, skip everything else
if exist "%KProgramFiles%QuestKACEAMPTools.exe" goto skip
goto install

:skip

echo [MSGCODE: 014] KACE SMA Agent is already installed.
goto end

:install

REM Run our msi installer
echo [MSGCODE: 015] Executing MSI installer.


echo on

start /wait msiexec.exe /qn /l*v %temp%ampmsi.log /i %INSTALLER% HOST=%KBOX_SERVER% TOKEN=%TOKEN%

echo off
set retcode=%errorlevel%
echo Return code (MSI_ERROR_LEVEL) from MSI execution: [%retcode%]
REM detect and print error related to trying to install 5.4 agent on Windows 2000
if "%retcode%"=="1" type %temp%ampmsi.log | findstr ERROR_INSTALL_REJECTED | findstr /V --

REM Detect when installation fails because PowerShell is not installed.
if "%retcode%"=="1603" type %temp%ampmsi.log | findstr /I /c:"This version of Windows is not supported. Installation will now abort. "

REM Report if the agent is installed, so the KACE SMA provisioning system
REM can record success or failure.
REM The server will be looking for this string, so don't change it,
REM without changing it as well.
if exist "%KProgramFiles%QuestKACEAMPTools.exe" echo [MSGCODE: 001] KACE SMA Agent is installed.
if not exist "%KProgramFiles%QuestKACEAMPTools.exe" echo [MSGCODE: 002] KACE SMA Agent is not installed.

REM Wait 20 seconds for KONEA to start and create kuid.txt.
ping 127.0.0.1 -n 20 -w 1000 > nul

echo [MSGCODE: 091] Agent installation succeeded.

REM Dump our KUID
if exist "%ALLUSERSPROFILE%QuestKACEkuid.txt" set /p KUID=<"%ALLUSERSPROFILE%QuestKACEkuid.txt"
if not "%KUID%"=="" echo [MSGCODE: 093] KUID value detected.
if not "%KUID%"=="" echo [MSGCODE: 094] KACE SMA agent KUID: %KUID%
if "%KUID%"=="" echo [MSGCODE: 095] KUID value not written by MSI installer.

:end

echo [MSGCODE: 100] End agent_msi_provision.bat processing.
Install Configure Quest – Then I can create my GPO.
Installation Folders
Install Configure Quest – Summary of agent installation folders and “critical” files:
- C:Program Files (x86)DellKACE or C:Program FilesDellKACE
- C:ProgramDataDellKACE
- Amp.conf => KACE server information
- Downloads => cache folder for installations
- User => folder containing logs
Application Catalog
Install Configure Quest – The application catalog is not immediately available; you must wait for the first backup, but you can force it.
- With license validation
Install Configure Quest – Since v7.2, it is possible to validate the license. This enables the application catalog.
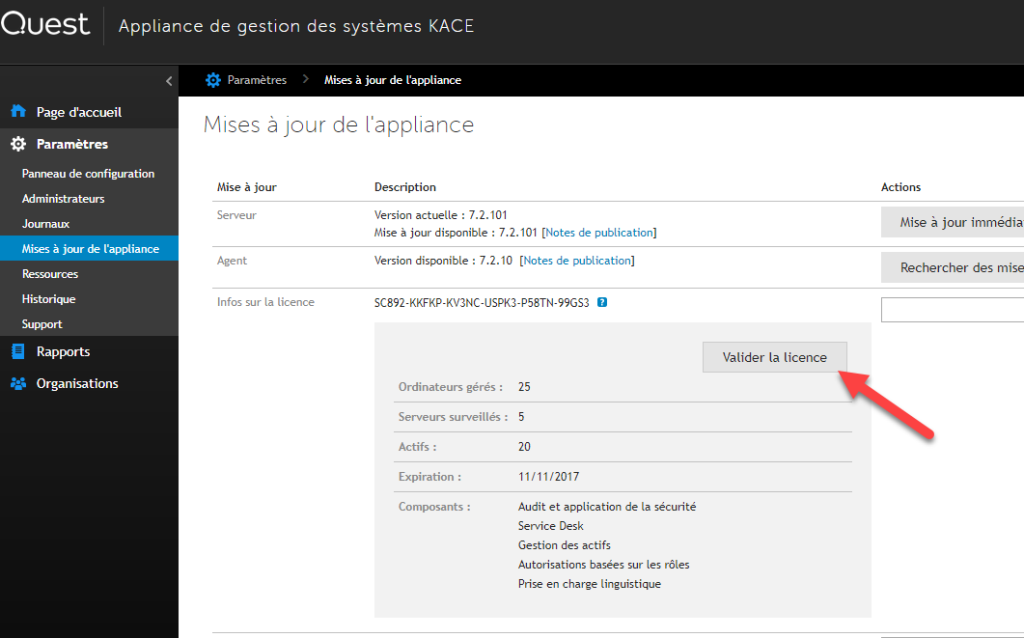
Install Configure Quest – – By running a backup, which has the same effect (works with all KACE versions).
Backups
Scheduling
- In “Settings Control Panel,” select “Backup Settings.” Then specify the backup time (During the backup, the appliance remains accessible).
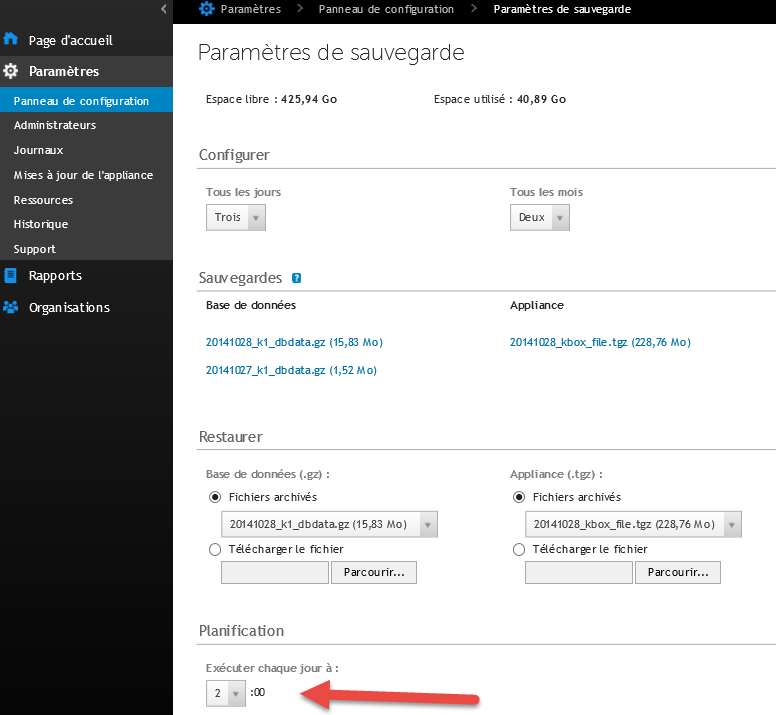
- In “Database Backup Retention,” specify the number of backups to keep. Only the database is affected by this setting; only one version is kept for application packages.
Install Configure Quest – Backup files are accessible via the links, but you can retrieve the files via FTP.
FTP
- In “Settings” “Control Panel,” select “Security Settings.” Then Enable FTP Backup
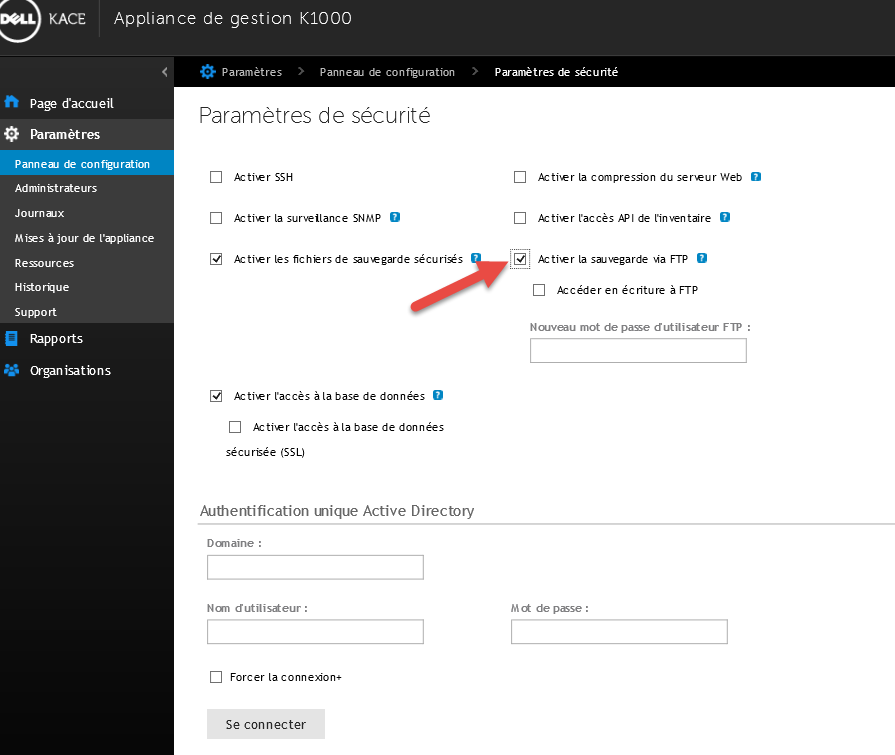
- The account for connecting is: kbftp, and the default password is: getbxf
Install Configure Quest – Windows FTP commands do not allow proper connection; you will need to use WinSCP in command line mode.
FTP Backup Script
Install Configure Quest – The WinSCP launch command:
winscp.com /console /script="%~dp0script.ftp"
Install Configure Quest – And here is the script: script.ftp
option batch abort
option confirm off
open ftp://kbftp:getbxf@K1000
lcd "C:UsersAdministratorDesktopbackup"
cd /
option transfer binary
get *_k1*.tgz
close
exit
- where getbxf is the FTP password
- where k1000 is the name of the K1000
- where C:UsersAdministratorDesktopbackup is the path where the files will be stored
Install Configure Quest – Here is an example script:
Install Configure Quest – https://github.com/dwbdav/LeBlogOSD/tree/main/kace/sma/backup-ftp
Install Configure Quest –