
Create a Mandatory User Profile in Windows 10 with Windows Master Images
Create Mandatory User – Create a mandatory user profile in Windows 10: run sysprep, copy the default profile, rename ntuser.dat to ntuser.man, and apply Group Policies
Introduction
Create Mandatory User – Mandatory user profiles ensure that users cannot make permanent changes to their profiles. Every time a user logs off, any changes made during the session are discarded. This is particularly useful in environments where consistency is crucial, such as in schools or shared workspaces.
Preparation
Create Mandatory User – Before creating a mandatory profile, you need to prepare a Windows 10 machine with the same release version as your target machines:
- Windows 10, versions 1507 and 1511: v5
- Windows 10, version 1607 (Anniversary Update) and version 1703 (Creators Update): v6
Create Mandatory User – Follow these steps:
- Install a Windows 10 machine with the same release version as the target machines.
- Configure the user profile, noting that some settings will reset after running sysprep.
- Run sysprep on the machine with the
CopyProfile=1option in theunattend.xmlfile.
Important Points
- The machine should be in a workgroup, not a domain.
- Use an administrator account with elevated rights, but not the built-in local administrator account.
- Ensure only one user profile exists on the machine. Remove any other profiles, including the administrator profile.
- Uninstall any store apps that are not needed.
XML File for Sysprep
Create Mandatory User – Create an unattend.xml file with the following content to enable the CopyProfile option:
<?xml version="1.0" encoding="utf-8"?>
<unattend xmlns="urn:schemas-microsoft-com:unattend">
  <settings pass="specialize">
    <component name="Microsoft-Windows-Shell-Setup" processorArchitecture="amd64" publicKeyToken="31bf3856ad364e35" language="neutral" versionScope="nonSxS" xmlns:wcm="http://schemas.microsoft.com/WMIConfig/2002/State">
      <CopyProfile>true</CopyProfile>
    </component>
  </settings>
</unattend>
Running Sysprep
Create Mandatory User – Run the following command to execute sysprep with the unattend.xml file:
c:windowssystem32sysprepsysprep.exe /oobe /generalize /unattend:"unattend.xml"
Create Mandatory User – It’s recommended to use a virtual machine (VM) for these actions, allowing you to create a snapshot before running sysprep for easy rollback if needed.
Copying the Default Profile
Create Mandatory User – After running sysprep, follow these steps to copy the default profile:
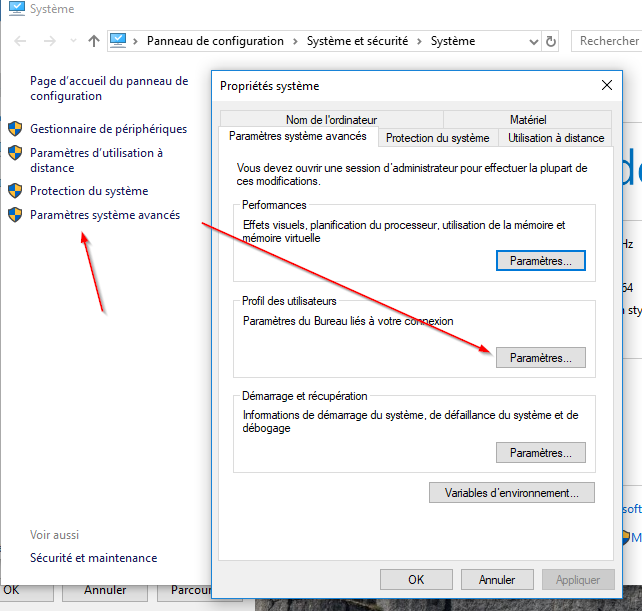
- Log in to the machine with an administrator account. If sysprep worked correctly, the account will have the same customization as before sysprep.
- Copy the default profile to a network share accessible by all users. Ensure the users have read permissions to this share.
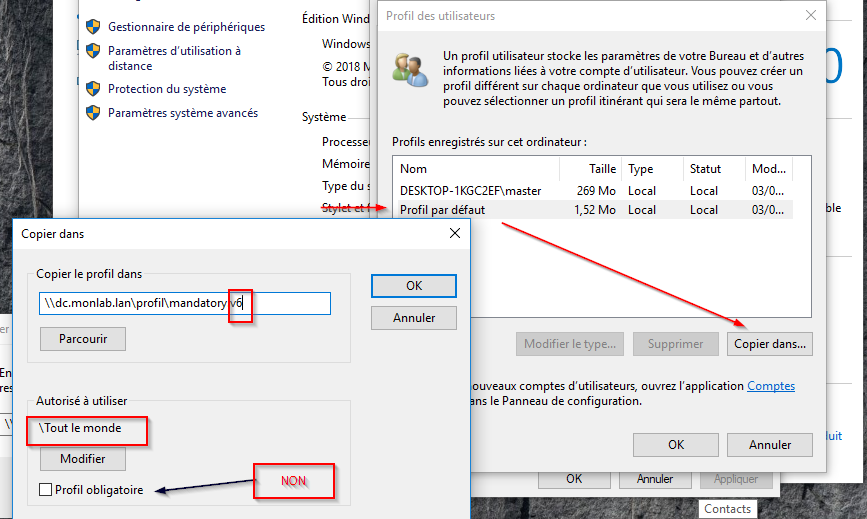
- Go to the user profile settings and copy the default profile to the UNC path with a
.V6suffix for versions 1709 and 1803. - Add read permissions for all users. This applies both file permissions and registry key permissions.
- Do not check “Mandatory Profile” as this can block session logins on version 1803.
Finalizing the Profile
Create Mandatory User – Some settings may need to be reconfigured post-sysprep. To finalize the mandatory profile:
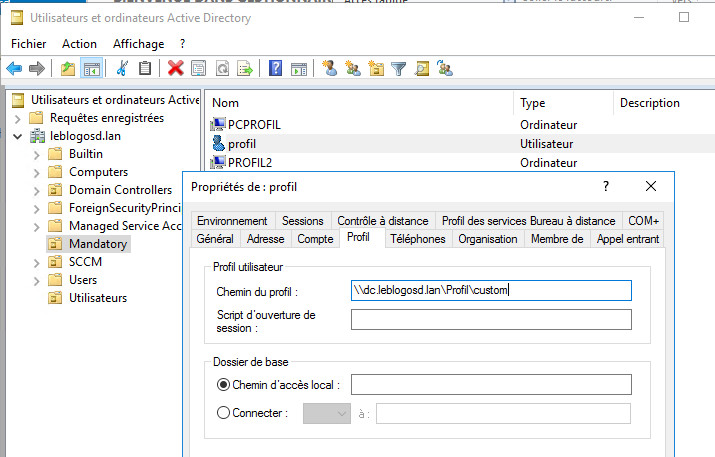
- Set the profile path in Active Directory without the
.V6suffix. - Log in with the account on a domain-joined machine and finalize the profile setup.
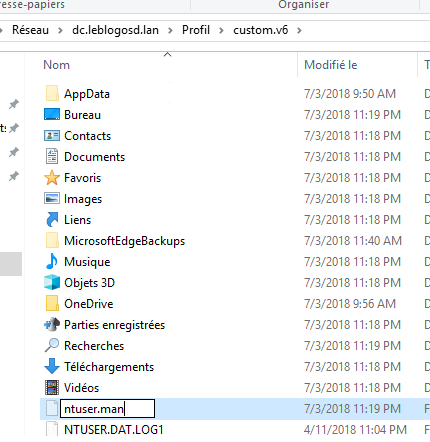
- Log off to save changes, then rename
ntuser.dattontuser.man.
Configuring Group Policies
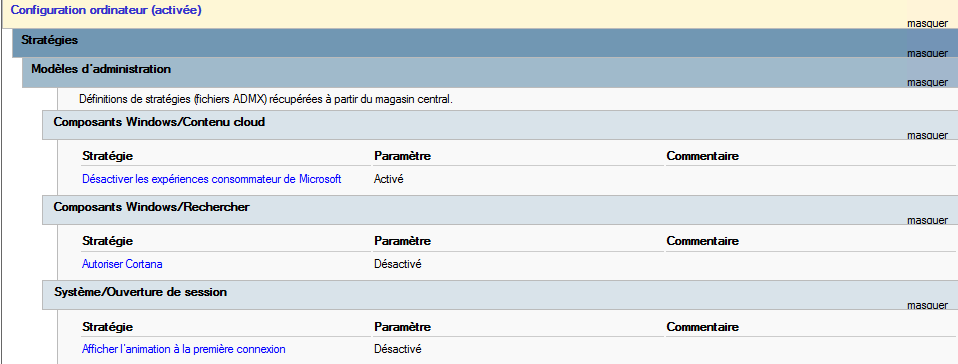
Create Mandatory User – Apply necessary Group Policies to manage the mandatory profile:
Create Mandatory User – Refer to the official documentation for detailed steps: Microsoft Documentation.