Server Core Installation – Service accounts are deliberately spread out, but you can reduce the number of LANDESK accounts.
Server Core Installation – The account names are examples, and these names will be used throughout the rest of the article.
LDMSadmin (SQL)
Server Core Installation – Permissions: DBowner of the SQL database
LDMSreport (SQL)
Server Core Installation – Permissions: Data_Reader of the SQL database
Support (CSA)
Server Core Installation – Usage: Account for PMAD on internet workstations
LDMSinstall (AD Account)
Server Core Installation – Permissions: Add this account to the local Administrators group of the LANDESK server
Server Core Installation – Usage: LANDESK installation
LDMSread (AD Account)
Server Core Installation – Permissions: Read access to shares containing applications, patches, and masters
Server Core Installation – Usage: Preferred server
LDMSwrite (AD Account)
Server Core Installation – Permissions: Write access to shares containing applications, patches, and masters
Server Core Installation – Usage: Preferred server
LDMSservice (AD Account)
Server Core Installation – Permissions: Administrator of the core server, administrator of workstations
Server Core Installation – Usage: Used for the LANDESK scheduler and for installing agents on workstations
LDMScom (AD Account)
Server Core Installation – Permissions: Member of the local Administrators group, LANDESK administrator group, and LANDESK Management Suite group
Server Core Installation – Usage: For COM+ objects
LDMSIntegrationAD (AD Account)
Server Core Installation – Permissions: Integrate workstations into the domain
Server Core Installation – Usage: LANDESK provisioning
LDMSreadAD (AD Account)
Server Core Installation – Permissions: Standard user of AD
Server Core Installation – Usage: Read access in AD
Installation
Download Sources
Server Core Installation – See download for installation sources. You will need an IVANTI account to download the sources.
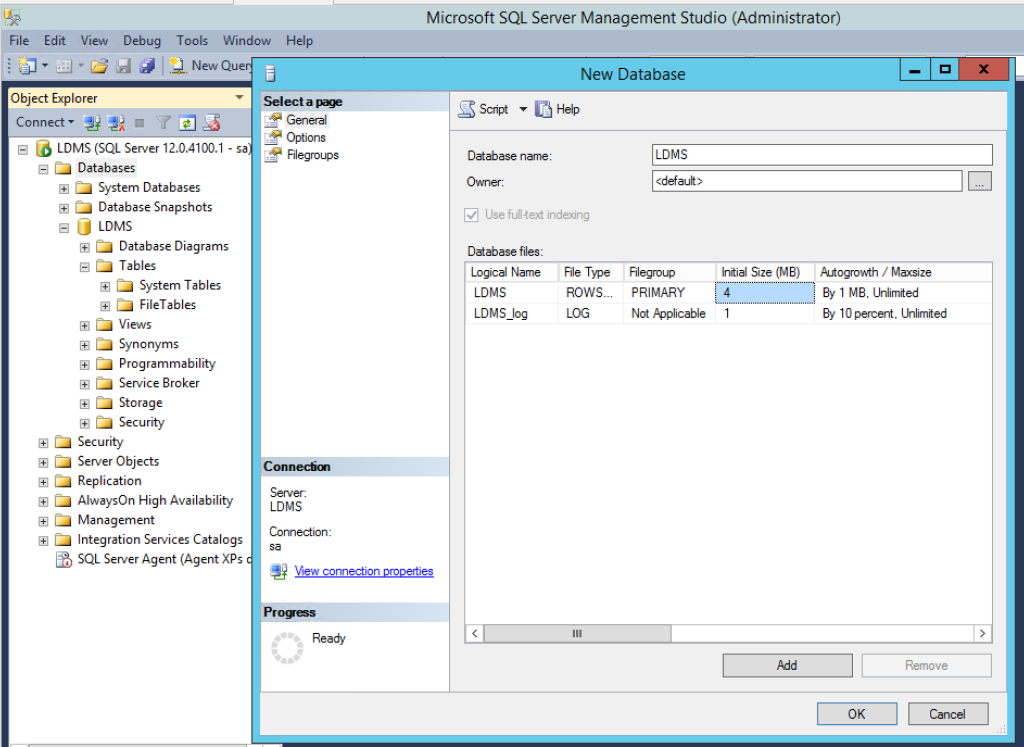
Creating the Database
Server Core Installation – Simply create an empty database on a SQL server. The SQL server can be installed on the LANDESK core server or on a shared SQL server.
Server Core Installation – Two points of attention for SQL:
Do not use a French collation but rather the collation SQL_LATIN_CP1_CI_AS. I have not found documentation on the possible collations, but the French collation causes problems during LANDESK version upgrades.
Use passwords for SQL accounts that do not contain the characters $, -, _
Server Core Installation – => Create an empty database
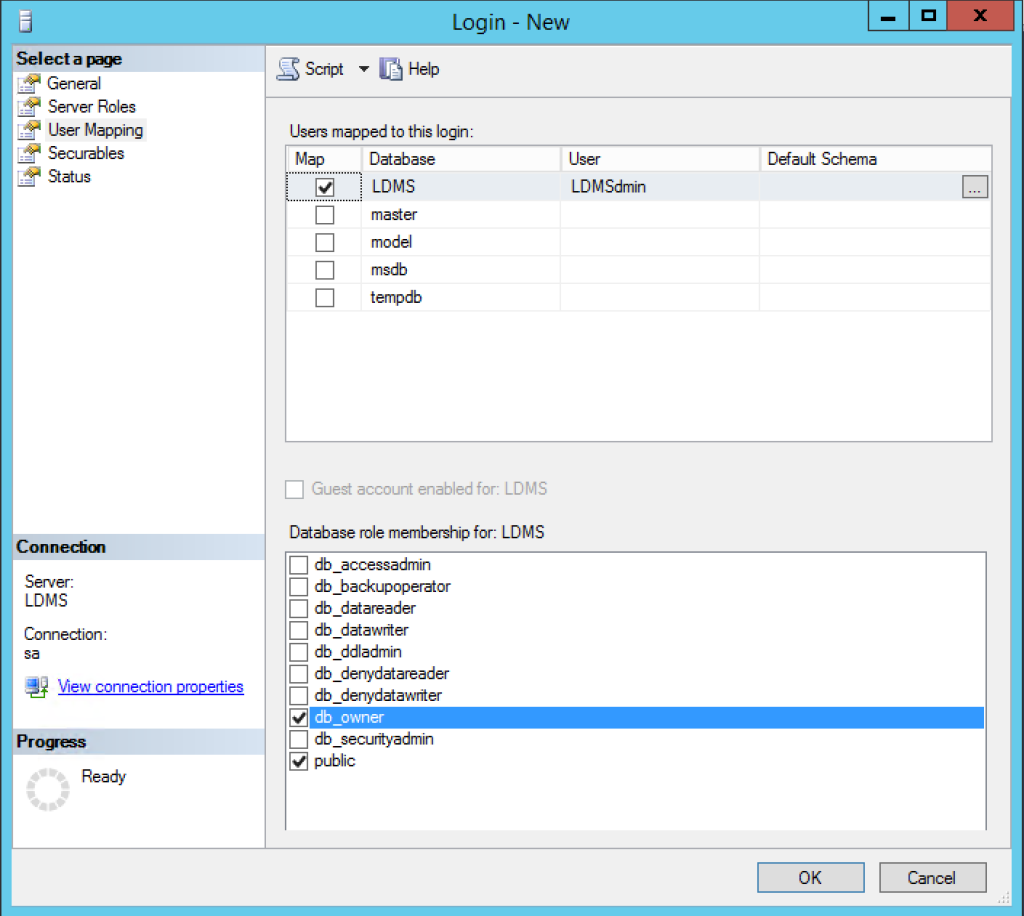
Server Core Installation – => Create the LDMSadmin account
Server Core Installation – => And grant this account DB_Owner rights on the LANDESK database
Server Core Installation – => Create the LDMSreport account
Server Core Installation – => And grant it db_datareader rights on the LANDESK database
EPM Installation
Server Core Installation – As a habit, I install LANDESK/EPM in English on an EN-US core server
Server Core Installation – Use the LDMSinstall account to install LANDESK
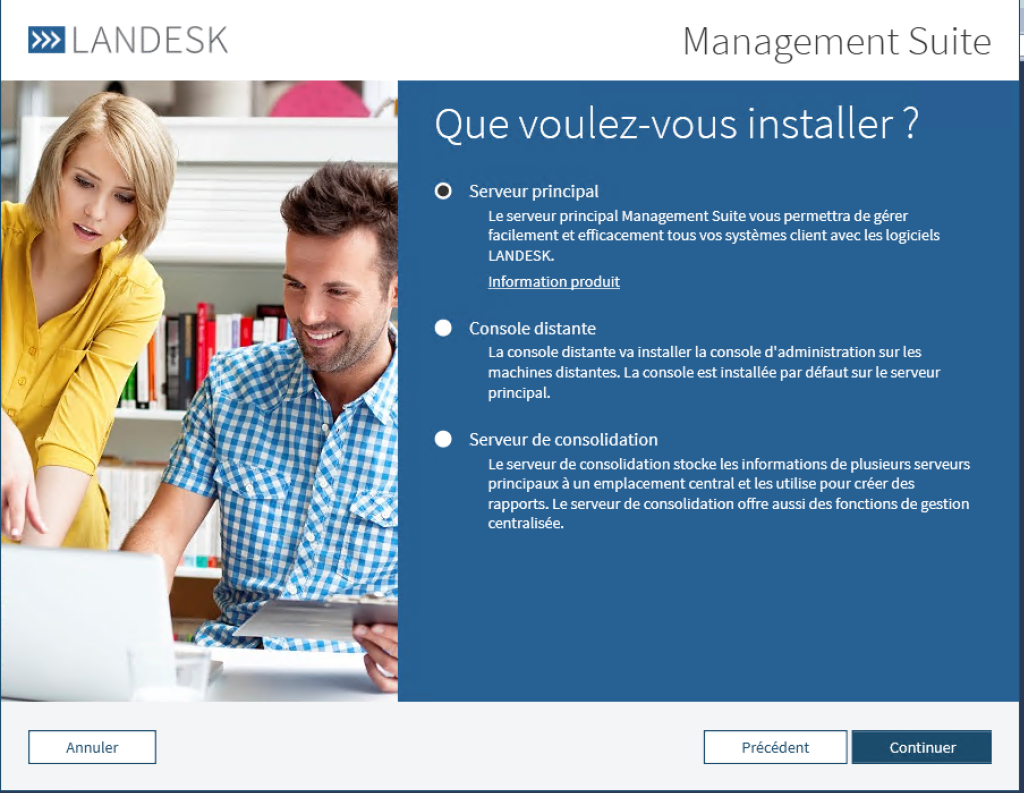
Server Core Installation – => Start the LANDESK installation and choose the installation language
Server Core Installation – The installation language will also be the EPM console language on the core server
Server Core Installation – => Select “Primary Server”
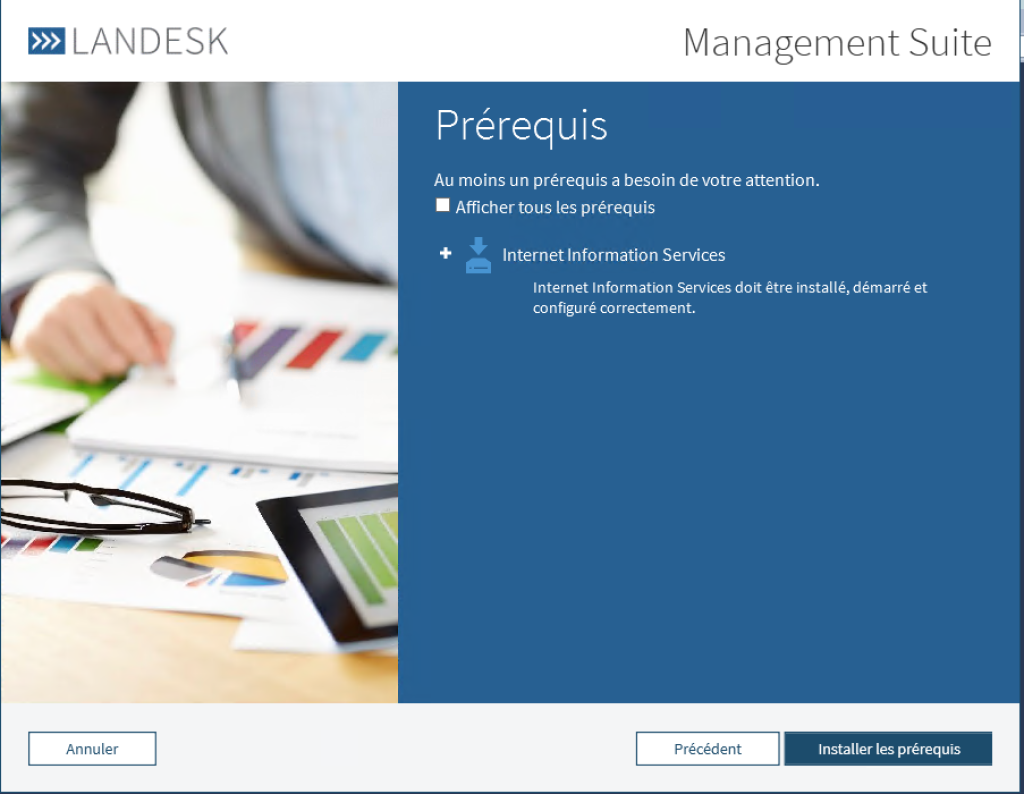
Server Core Installation – => Install prerequisites
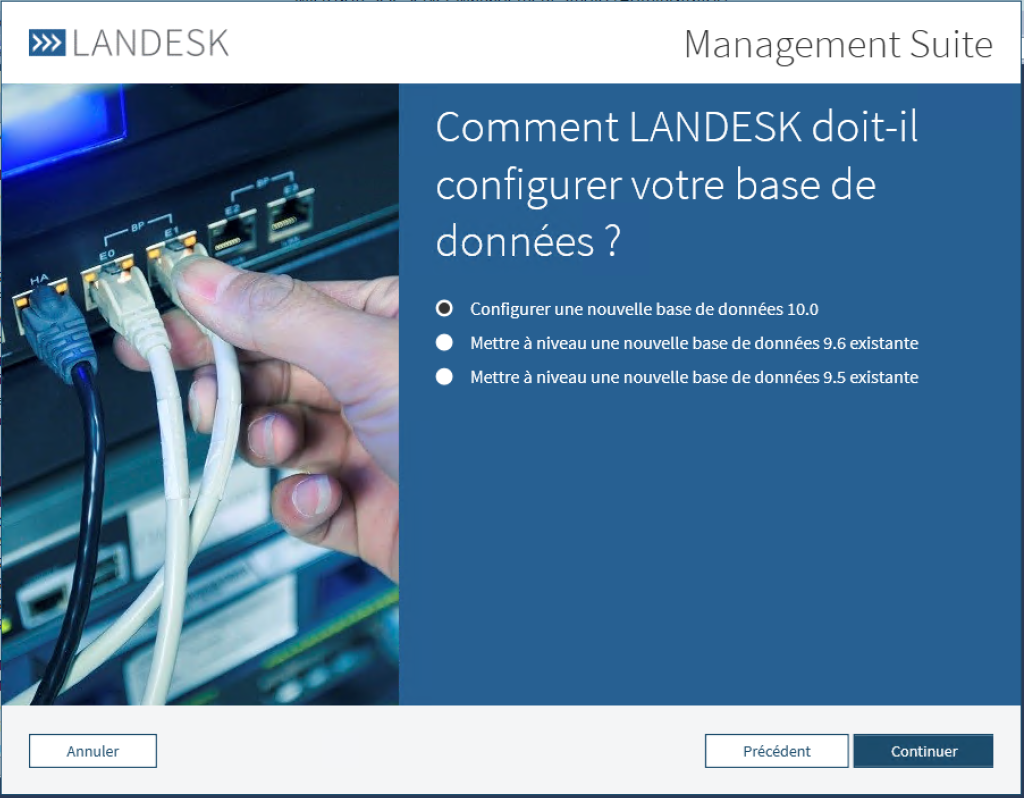
Server Core Installation – => For a new installation, configure a new database
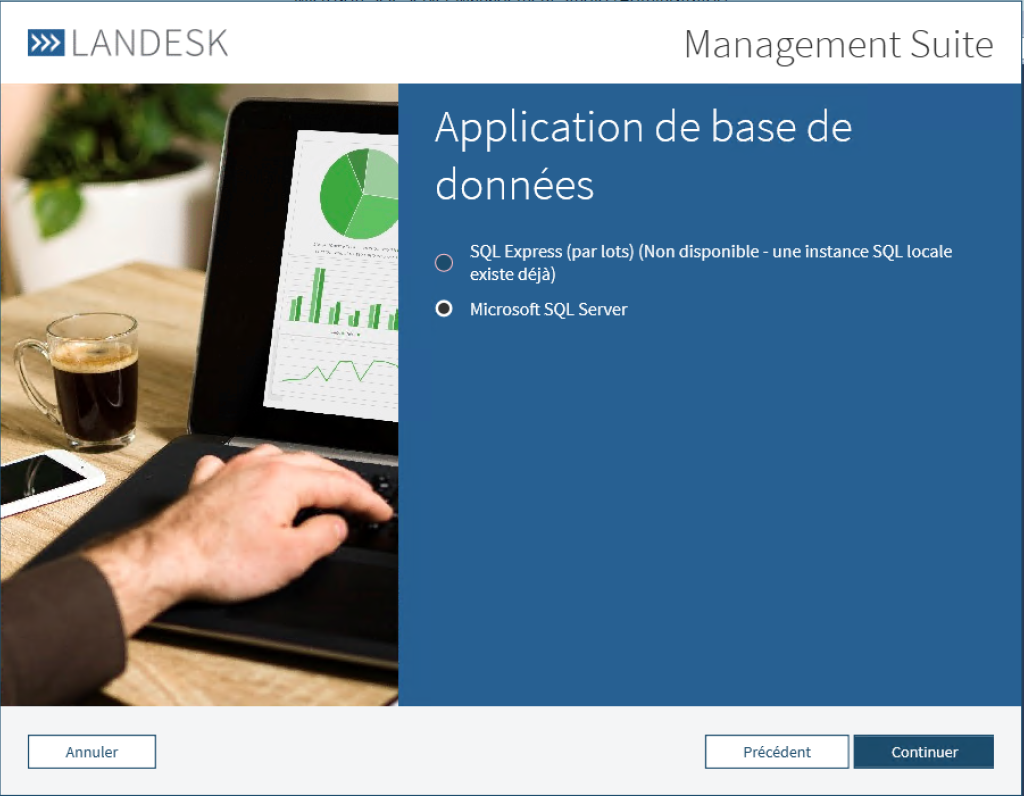
Server Core Installation – => SQL Server is recommended, but in a lab, SQL Express can be used
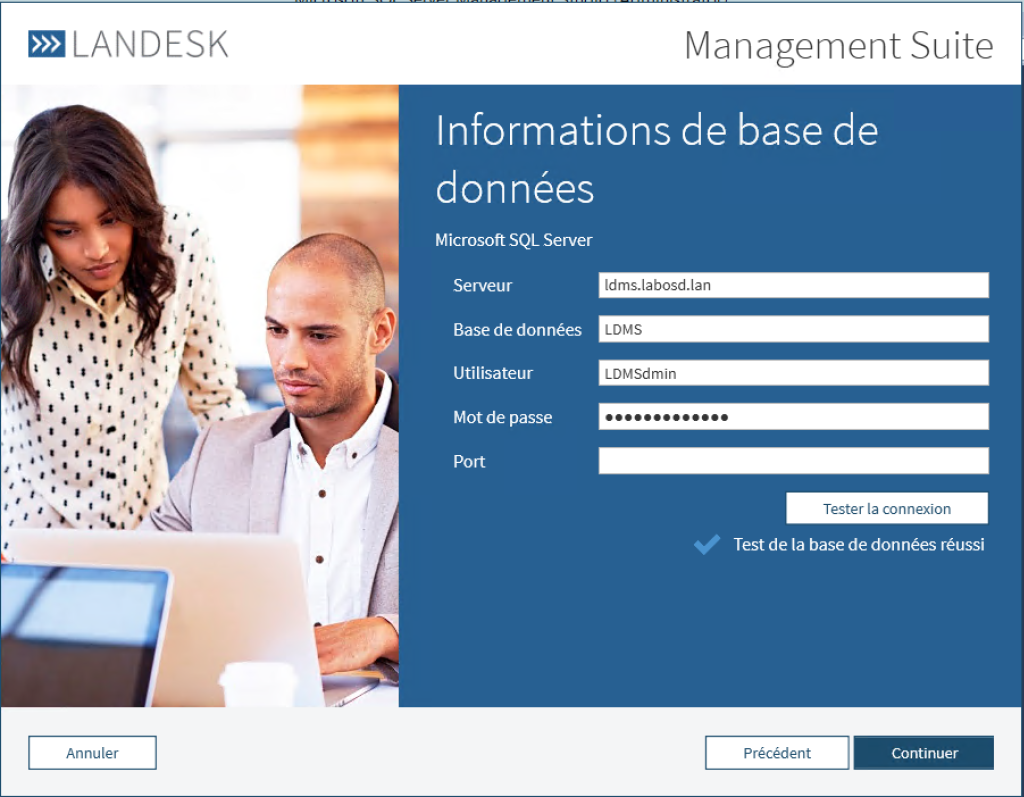
Server Core Installation – => Enter the information to connect to the empty database you created. The port number is not necessary if it is the default on SQL
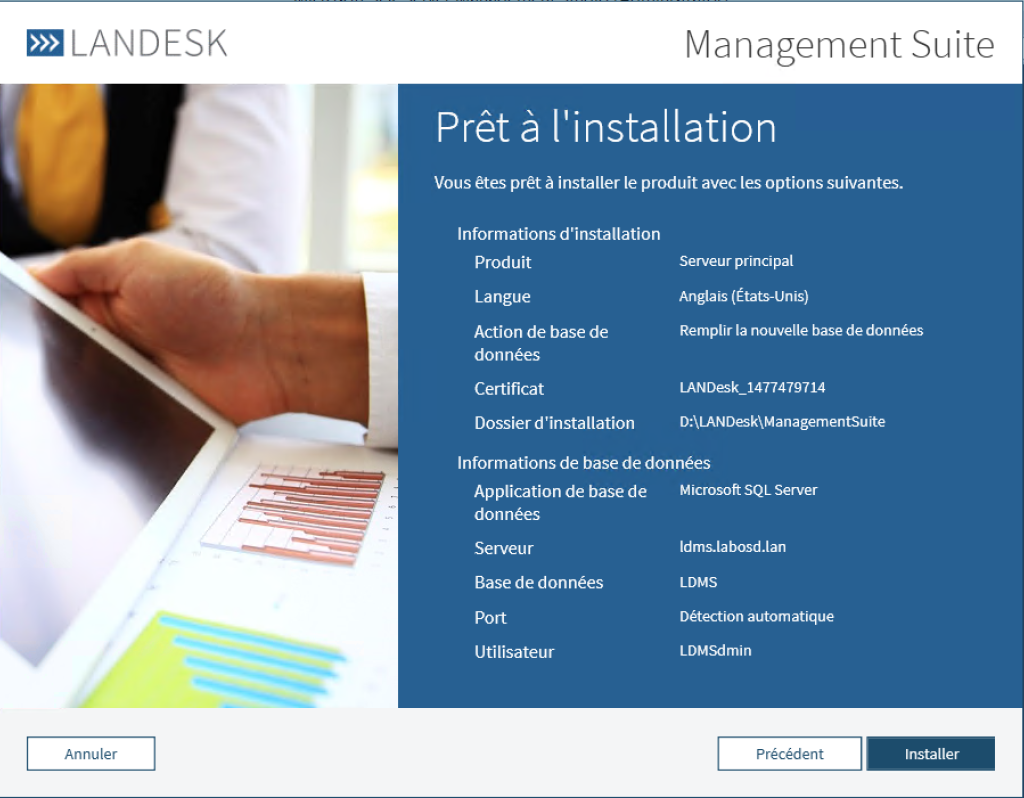
Server Core Installation – => Specify the installation path. Some files will still be present in C: (such as LANDESK certificates)
Server Core Installation – => Enable certificate management. Note that if you have LANDESK clients 9.5 or 9.6, DO NOT ENABLE this option
Server Core Installation – => Start the installation and go get a coffee. The installation takes about an hour.
Server Core Installation – => Once the installation is complete, install the SU patches if needed, with a reboot each time.
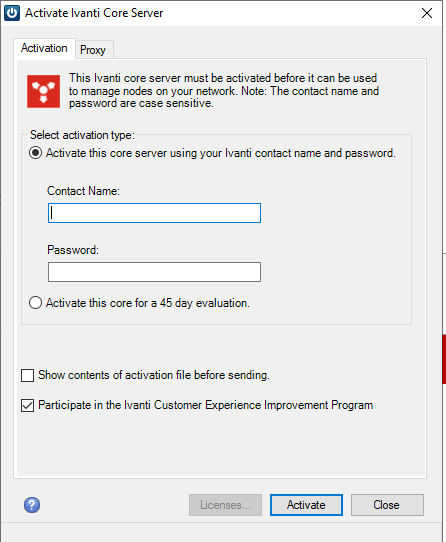
Activation
Server Core Installation – At the first launch, the activation request should appear.
Server Core Installation – Once the credentials are entered, the core server will be activated.
Configuration
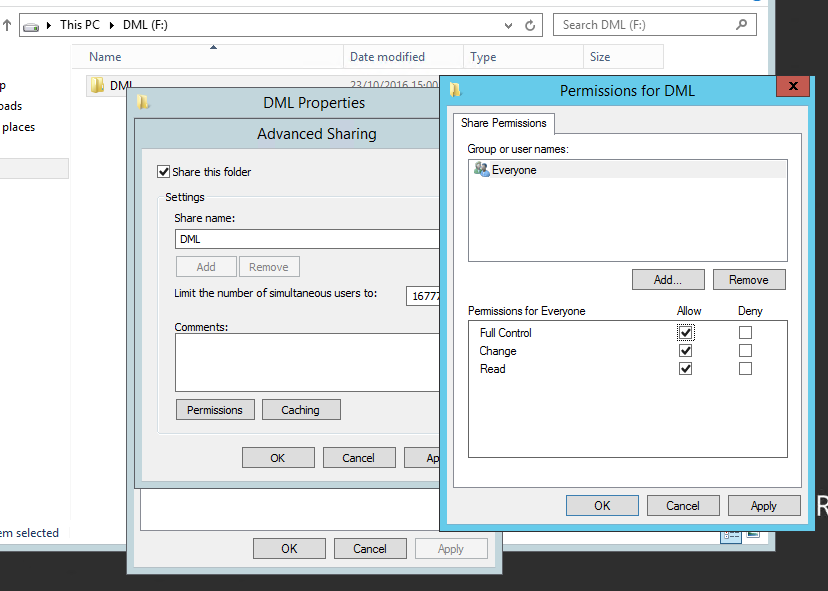
Creating Shares
Server Core Installation – To function correctly, LANDESK needs two shares:
One UNC share that will be primarily used for OS deployments and for replication with preferred servers
One HTTP share that will be used for deploying applications and patches
Server Core Installation – => Create a Windows share with everyone having full control in share permissions (or authenticated users)
Server Core Installation – This folder can be located on the core server or on a separate file server
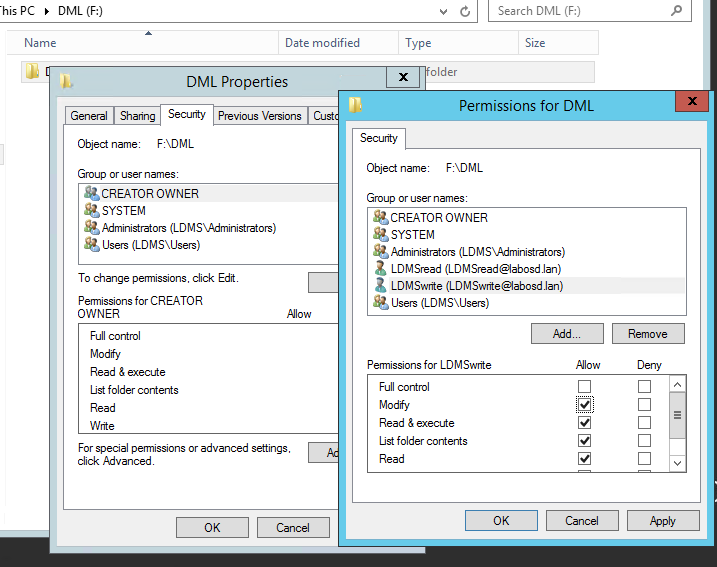
Server Core Installation – => Add the LDMSread account with read permissions and the LDMSwrite account with write permissions in NTFS permissions
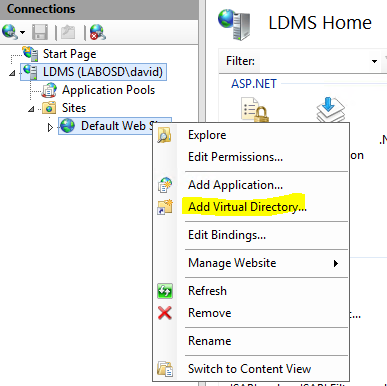
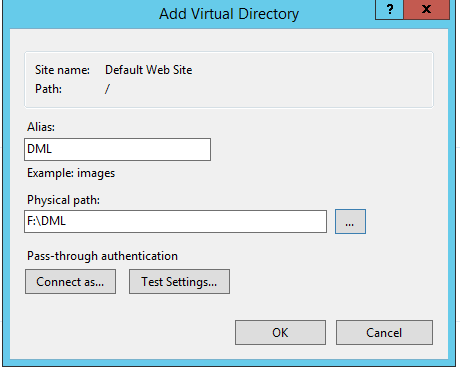
Server Core Installation – => Launch the IIS console, then in the default website, create a “Virtual Directory”
Server Core Installation – Note, this share must be located on the core server if you have a CSA
Server Core Installation – Note: if the share is on a UNC share (separate file server), use the LDMSwrite account. When enabling directory browsing in IIS, IIS will need to create a config XML file.
Server Core Installation – => Specify a share name IDENTICAL (not mandatory but simpler) to the Windows share name
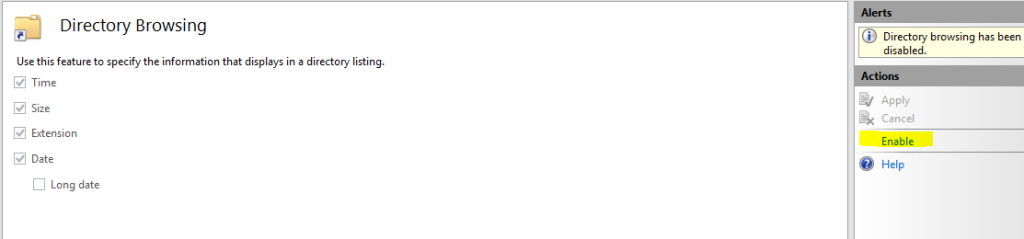
Server Core Installation – => Enable directory browsing in this folder
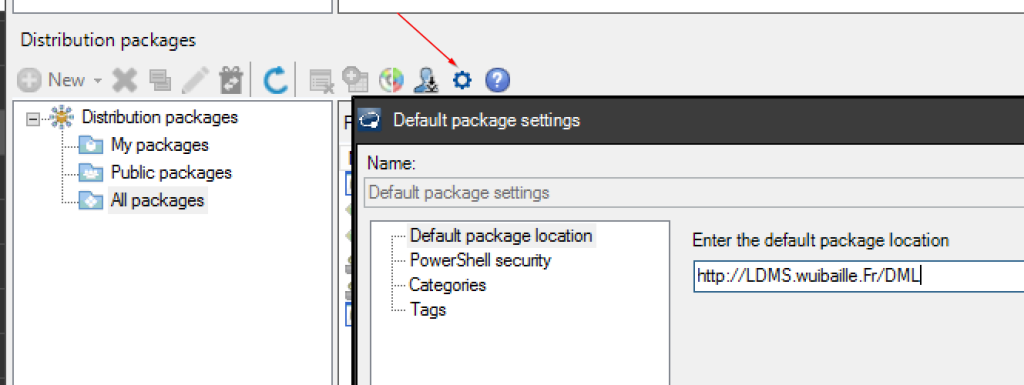
Server Core Installation – => In package management, change the default path to point to your HTTP share
Scheduler Configuration
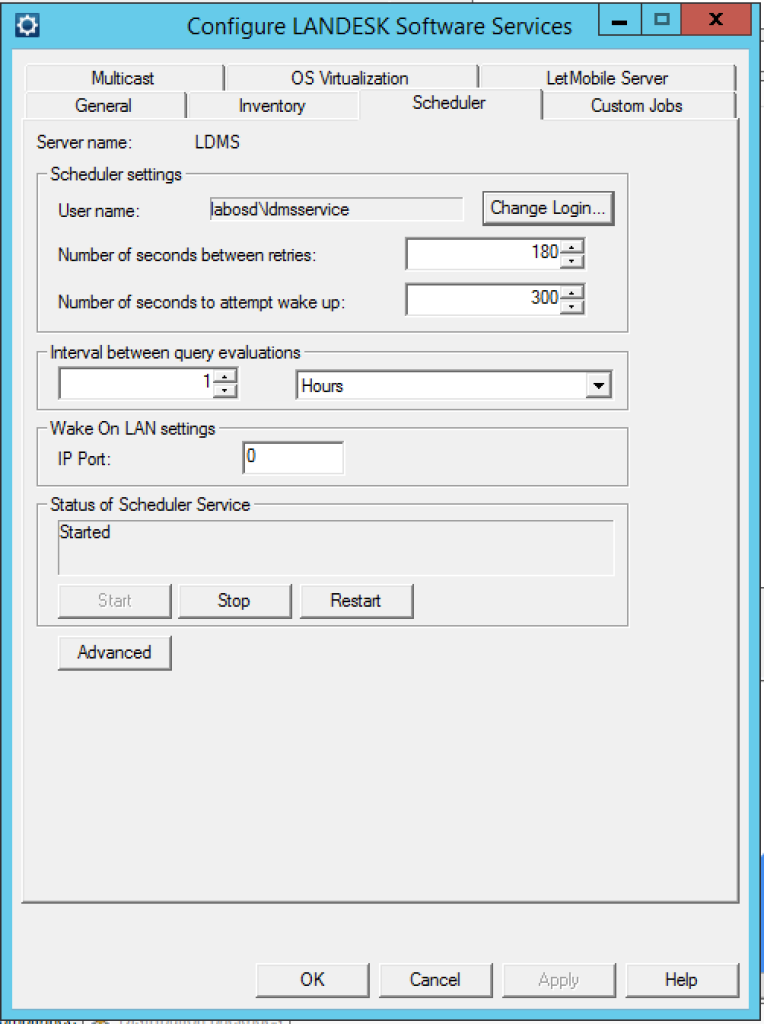
Server Core Installation – Launch “Ivanti Configure Services”
In the Scheduler tab, select the LDMSservice account
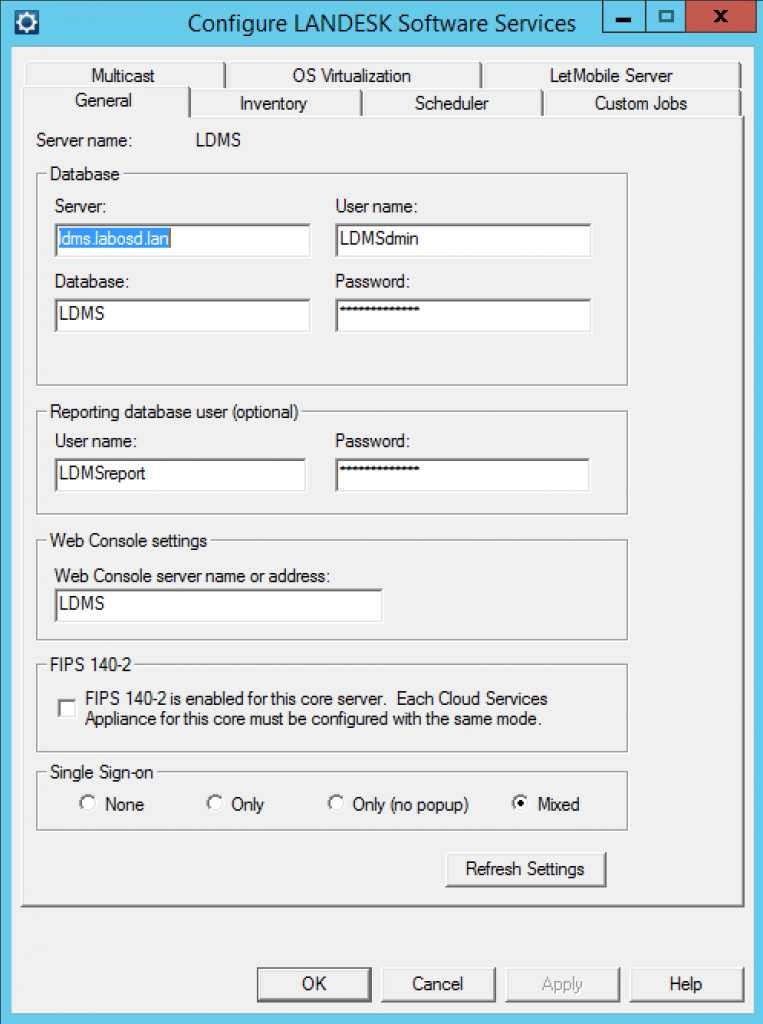
SQL Account Configuration for Reports
Server Core Installation – => In the “Configure” menu, then “Service” from the LANDESK console
Server Core Installation – In the General tab, specify the LDMSreport account
Certificate Management
Server Core Installation – Launch the IVANTI console
In the “Configure” menu, then “Client Access”
Check “Automatically approve new certificates”
Server Core Installation – This will facilitate deployment. Once the EPM agent deployment is finalized, you can disable this option.
COM+ Configuration
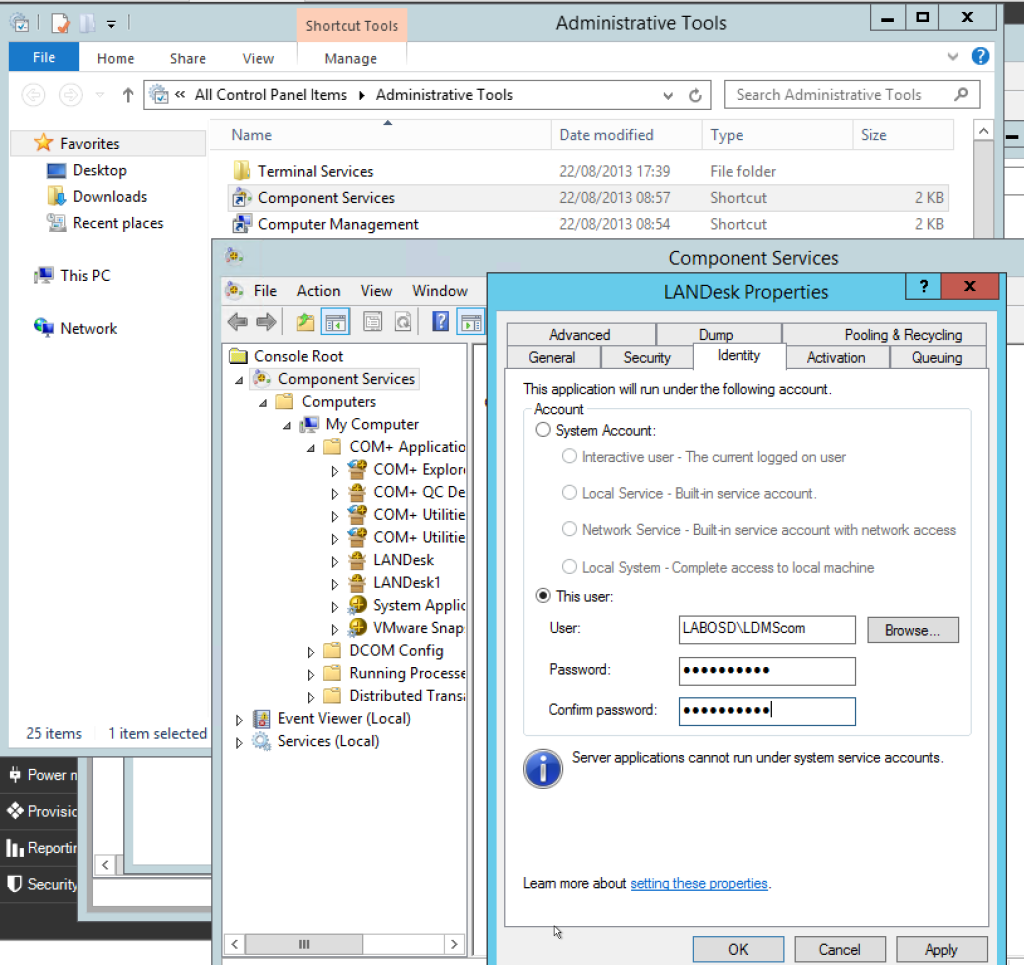
Server Core Installation – In Windows Administrative Tools
Select “Component Services”
Configure the two COM+ objects
LANDESK
LANDESK1
Server Core Installation – with the LDMScom account
Patch Management
On the core server, launch “Core Server Activation”, then click on the licenses button
Server Core Installation – When upgrading to a new version of Ivanti, the patch management license may no longer work if the patch management versioning does not match your version of LANDESK.
Server Core Installation – Open a ticket with Ivanti for the patch management license update, then re-run the activation.