Deployment Scenarios
USMT can be used in various deployment scenarios:
New Computer (Bare Metal)
This is the easiest scenario as no data needs to be saved from the old system. Simply boot from a USB or PXE and install the new OS (e.g., Windows 7).
Upgrade
This involves reinstalling the OS to a higher version, such as upgrading from Windows XP to Windows 7. Save the user data using USMT to a network location, then restore it after the OS installation.
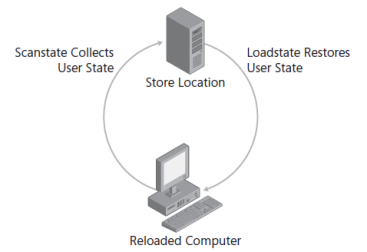
Refresh
Reinstall the same OS version, often used when a user encounters issues. Save the user data using USMT to a network location, then restore it after the OS installation.

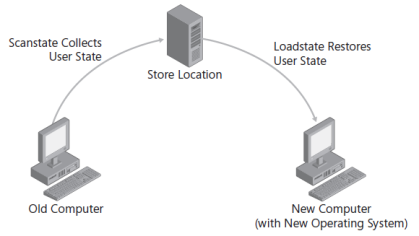
Replace
This is the most complex scenario, involving saving data from the old system and restoring it to a new system. You’ll need to associate the old and new systems to manage this migration effectively.
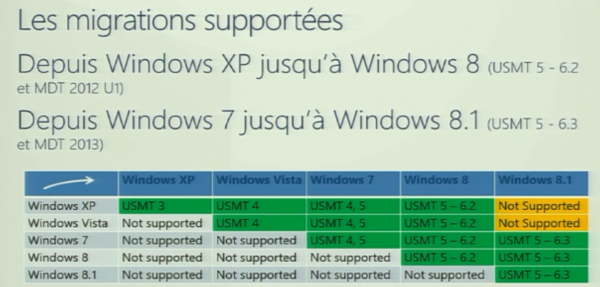
Supported Migrations
USMT supports various migrations based on the version:
- USMT 4.0 (Windows AIK): Supports migrating from Windows XP to Windows 7. Include Office 2013 as per this guide.
- USMT 5.0 (Windows ADK 8.0): ScanState.exe and LoadState.exe version 6.2.
- USMT 5.0 (Windows ADK 8.1): ScanState.exe and LoadState.exe version 6.3. (Not available for download anymore)
- USMT 5.0 (Windows ADK 8.1 update): Includes patches for ScanState.exe, LoadState.exe, and UsmtUtils.exe version 6.3.
Download links:
- USMT 4.0
- USMT 5.0 (Windows ADK 8.0)
- USMT 5.0 (Windows ADK 8.1 update)
Modifying MigUser.xml
USMT saves files with known extensions across all drives by default. To configure this, modify the MigUser.xml file.
Saving Additional Files
Add additional extensions to save:
1 2 3 | <script>MigXmlHelper.GenerateDrivePatterns("*[*.pdf]", "Fixed")</script><script>MigXmlHelper.GenerateDrivePatterns("*[*.jpg]", "Fixed")</script><script>MigXmlHelper.GenerateDrivePatterns("*[*.png]", "Fixed")</script> |
Changing Restore Location
To restore files to a specific location, modify the MigUser.xml file:
1 | <locationModify script="MigXmlHelper.Move('%SYSTEMDRIVE%\AncienPC')"></locationModify> |
Disabling USMT Options
Generate a configuration file to disable certain components:
1 | <USMTPath>\Amd64\Scanstate.exe /genconfig:MyConfig.xml /i:<USMTPath>\Amd64\migapp.xml /i:<USMTPath>\Amd64\miguser.xml |
In MyConfig.xml, set migrate="no" for components to disable.
Example Command Line
Use the following commands to back up and restore data:
Saving Data
1 | scanstate.exe "savepath" /v:13 /c /o /ue:Administrator /localonly /i:<USMTPath>\Amd64\MigApp.xml /i:<USMTPath>\Amd64\MigUser.xml /config:<USMTPath>\Amd64\config.xml /l:"logpath.log" |
Restoring Data
1 | loadstate.exe "savepath" /v:13 /c /lac /i:<USMTPath>\Amd64\MigApp.xml /i:<USMTPath>\Amd64\MigUser.xml /l:"logpath.log" |
Saving Data from D: Drive
To back up the D: drive and restore it, modify MigUser.xml:
Keeping D: Partition
1 2 3 4 5 6 7 8 9 10 11 12 | <component type="Documents" context="System"> <displayName>Component to migrate all D: drive</displayName> <role role="Data"> <rules> <include> <objectSet> <pattern type="File">D:\*[ * ]</pattern> </objectSet> </include> </rules> </role></component> |
Not Keeping D: Partition
1 2 3 4 5 6 7 8 9 10 11 12 13 14 15 16 17 | <component type="Documents" context="System"> <displayName>Component to migrate all D: drive</displayName> <role role="Data"> <rules> <include> <objectSet> <pattern type="File">D:\*[ * ]</pattern> </objectSet> </include> <locationModify script="MigXmlHelper.Move('%SYSTEMDRIVE%\AncienD')"> <objectSet> <pattern type="File">D:\*[ * ]</pattern> </objectSet> </locationModify> </rules> </role></component> |
Choosing the Right USMT Version
Use USMT from Windows ADK 8.0 for migrating from Windows XP to Windows 7, and Windows 7 to Windows 7. Use USMT from Windows ADK 8.1 for migrating from Windows 7 to Windows 8.1, and Windows 8.1 to Windows 8.1.
Download USMT from:

0 Comments