Introduction
Tanium offers a powerful suite for deploying applications and updates across your entire IT infrastructure at scale. This guide walks you through creating custom software packages, deploying them to targeted endpoints, and monitoring or troubleshooting deployment status in real-time.
Manage Applications
Predefined Package Gallery
Tanium provides a robust library of pre-configured application packages ready for immediate deployment. These packages come pre-tested and include all necessary configurations, verification methods, and best practices. Visit the Deploy ➜ Software ➜ Predefined Packages section to browse available applications organized by category (Operating Systems, Utilities, Security, Productivity, etc.). Simply select a package and customize deployment parameters for your environment—installation scripts, requirements, and rollout schedules are already configured for reliability and speed.
Create a custom Application
Deploy an application that contains multiple files by uploading a single ZIP, then monitor eligibility and live deployment status.
Prepare Your Application Files
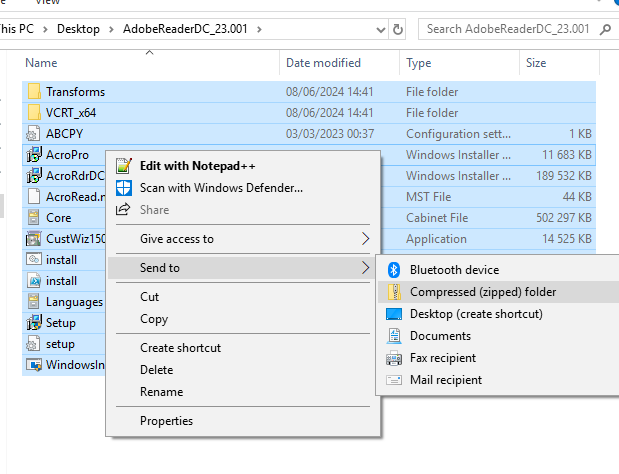
Organize files: gather EXEs/MSIs, configs, scripts, etc.
Create ZIP: compress all required content into one archive (folder contents for this example).
Create a New Package
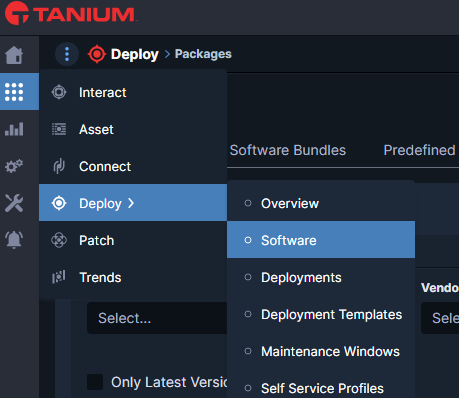
Step 1: Navigate to Deploy ➜ Software and click Create Software Package.
Step 2: In the Package Files section, upload your prepared ZIP archive.

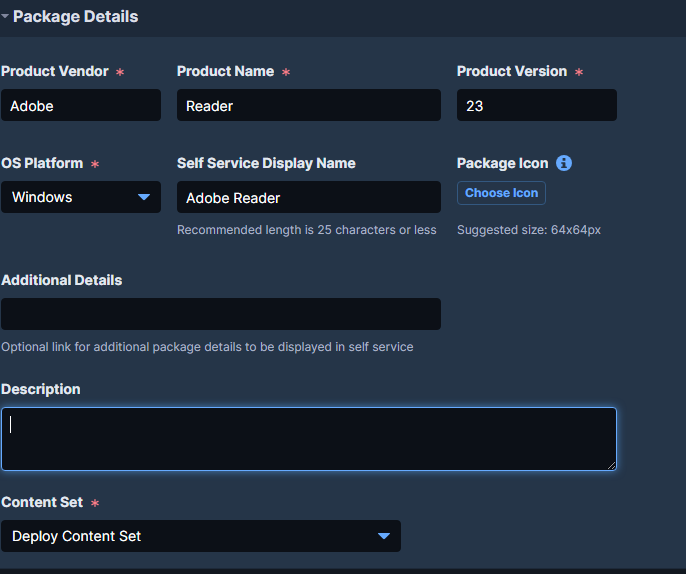
Step 3: Set a clear and descriptive Package Name in the Package Details section so it’s easily identifiable for deployments.
Step 4: Define any Requirements that must be met before installation (OS version, architecture, disk space, etc.).

Step 5: Add an installation action to Extract ZIP to the working directory. This ensures all package files are extracted before execution.
Warning: verify the uploader path and destination folder used by the next command.
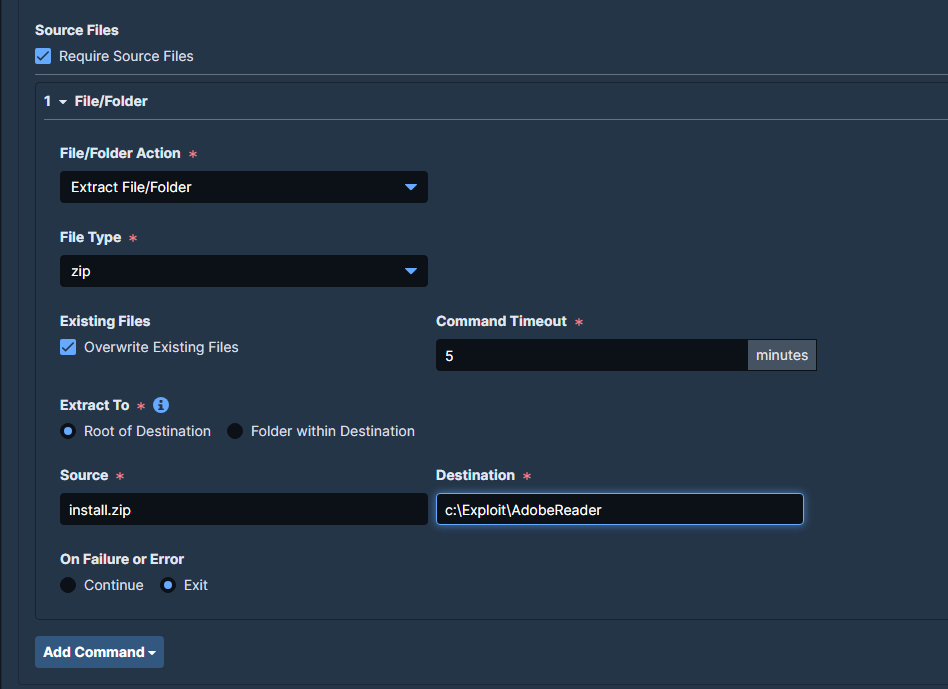
Step 6: Add a Run command action to launch your installation script. Example using PowerShell:
cmd.exe /c "powershell.exe -NoProfile -ExecutionPolicy Bypass -File c:\ProgramFiles\YourApp\install.ps1"
Replace the path with your actual installation script location within the extracted ZIP contents.

Step 7: Add Install Verification to confirm successful deployment. Choose from file existence checks, registry key validation, or running process detection—whatever best indicates successful installation.

Step 8: Click the Apply icon to save your changes, then click Create Package to finalize the package creation.

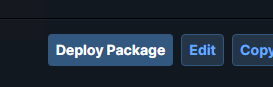
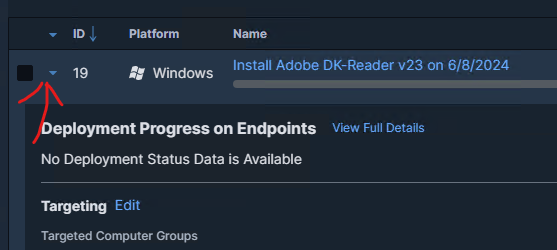
Deploy Application
Click Deploy Package to initiate a new deployment.
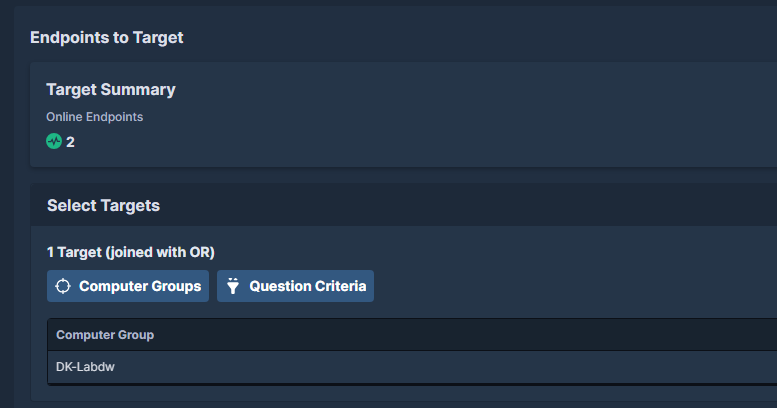
Select your Targets using groups or filters to define which endpoints receive the package.
Configure the Schedule for when the deployment should occur (immediate or specific time window).

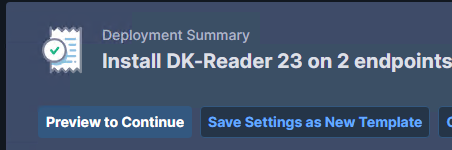
Preview deployment impact and affected device count before launching.
You can view deployment détail
Monitor & Troubleshoot
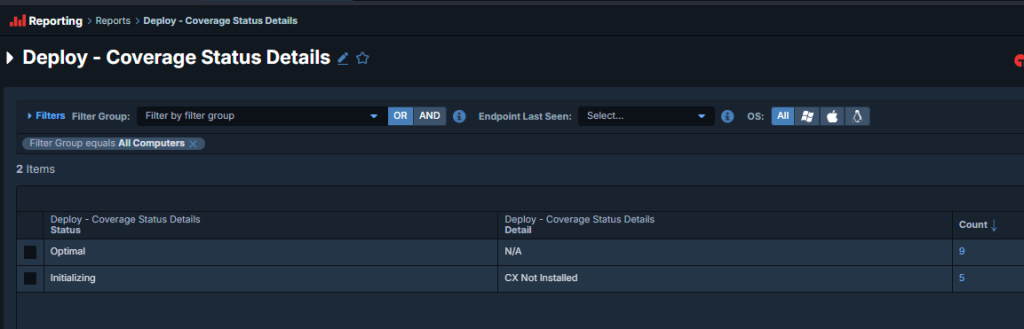
Coverage Status Details
Report ➜ Deploy ➜ Coverage Status Details
This report provides a comprehensive overview of deployment coverage, showing the status breakdown across all targeted endpoints (Waiting, Downloading, Installing, Completed, Failed, Not Applicable).
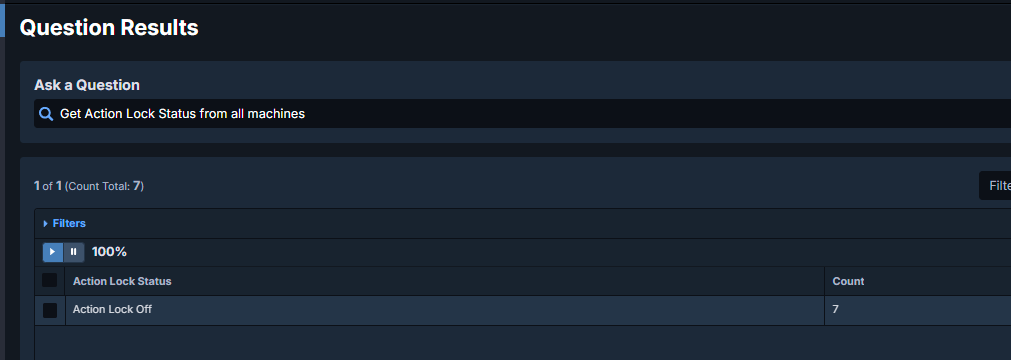
Action Lock Status
Verify that endpoints are not blocked by Action Lock, which can prevent software deployment. Use the following Interact query:
Get Action Lock Status from all machines
If Action Lock is enabled on target endpoints, you may need to disable it temporarily or schedule deployments during maintenance windows when Action Lock is not active.
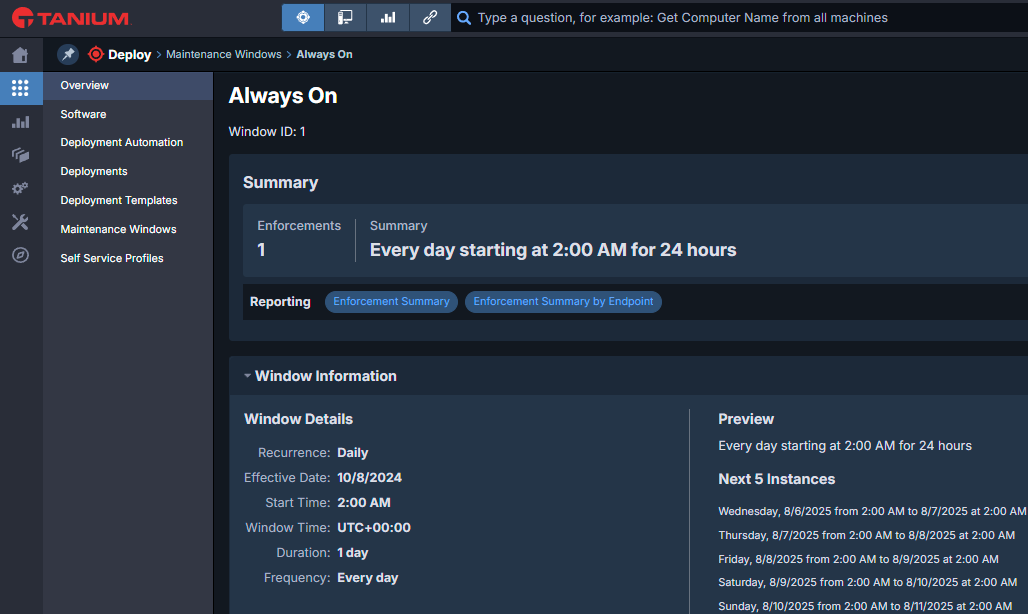
Maintenance Windows
Ensure all target endpoints are within an active Maintenance Window during the deployment period. Maintenance windows define the allowed time slots when deployments can execute on endpoints.
Deployments scheduled outside active maintenance windows will wait until the next available window, so coordinate your deployment schedule accordingly.
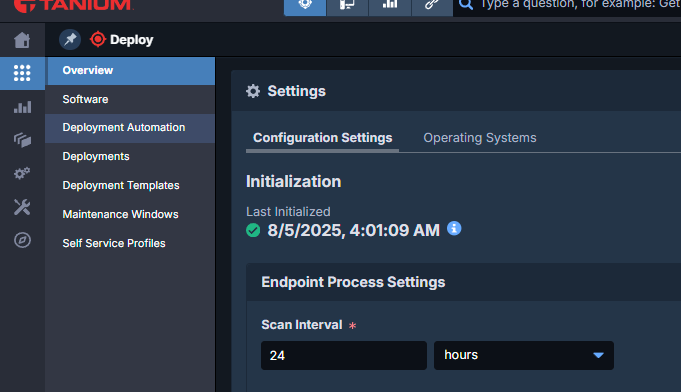
Scan Interval
The Scan Interval (default 24 hours) defines how frequently the Tanium client checks for eligible deployments. Confirm this interval aligns with your deployment rollout cadence to ensure timely application delivery.
If you need more frequent scans (e.g., for urgent security patches), consider reducing the interval, but be mindful of the impact on client resources and network bandwidth.
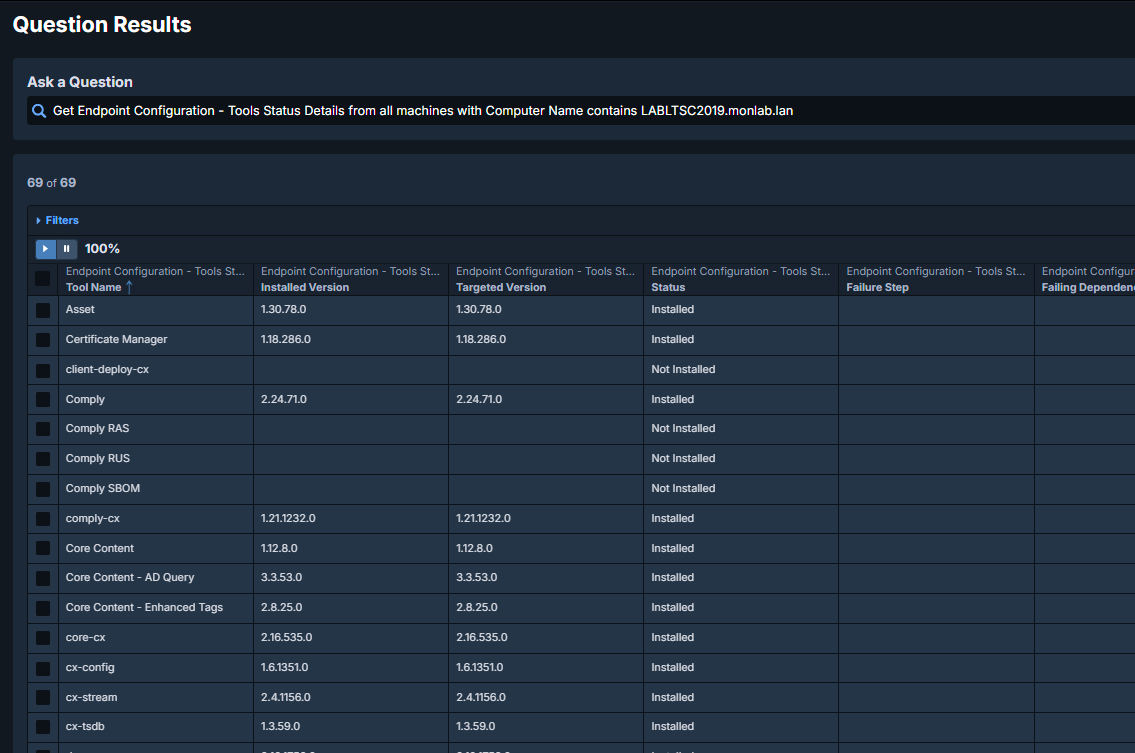
Tools Status Details
To troubleshoot a specific device, use the Interact query below. Replace LABLTSC2019.monlab.lan with your device’s computer name:
Get Endpoint Configuration – Tools Status Details from all machines with Computer Name contains LABLTSC2019.monlab.lan
This query provides detailed diagnostic information about the endpoint’s Tanium client tools status, helping identify deployment blockers.
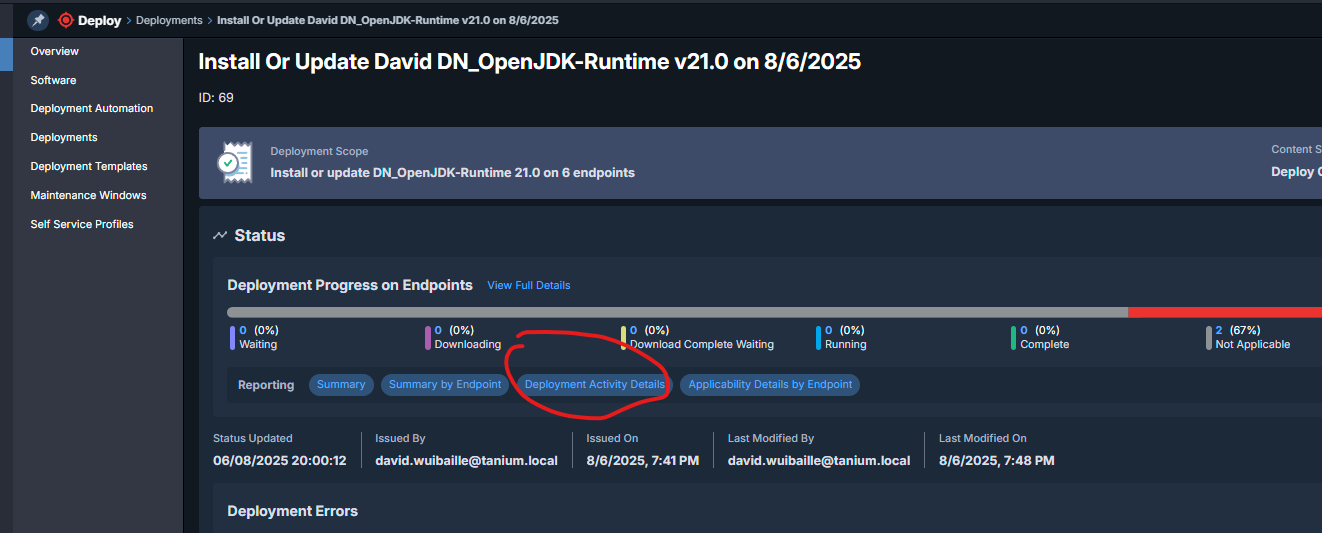
Deployment Status Views
You’ll see distinct phases for each endpoint:
- Waiting: Deployment scheduled but not yet started (waiting for maintenance window or other conditions).
- Downloading: Package files are being transferred to the endpoint.
- Installing: Installation script is running.
- Completed: Installation finished successfully.
- Not Applicable: Endpoint doesn’t meet package requirements (wrong OS, already installed, etc.).
- Failed: Installation encountered an error (check return codes in logs).
Use the Deployment Activity Detail report for phase-by-phase visibility into deployment progress.
Downloading Phase Example:

Installing Phase Example (with Return Codes):

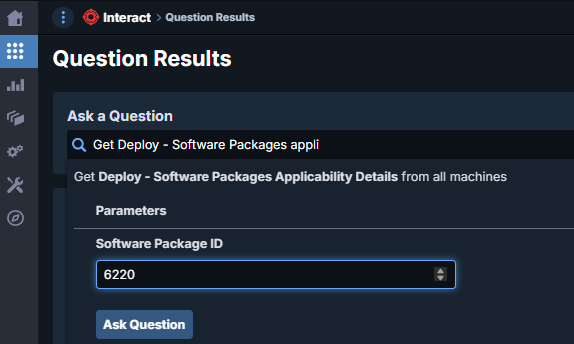
View Eligible (Applicability)
To check package eligibility across your infrastructure:
Step 1: Find the Package ID in the Software Packages list. In the example below, the Package ID is 6220 for the DN_OpenJDK-Runtime package.

Step 2: Run an Interact query to check applicability across all machines:
Get Deploy – Software Packages Applicability Details[6220] from all machines
Understanding Applicability Results: The query returns two key values: Update Eligible (endpoints that can receive the package) and Not Applicable (endpoints that don’t meet requirements—already installed, wrong architecture, OS incompatibility, etc.).
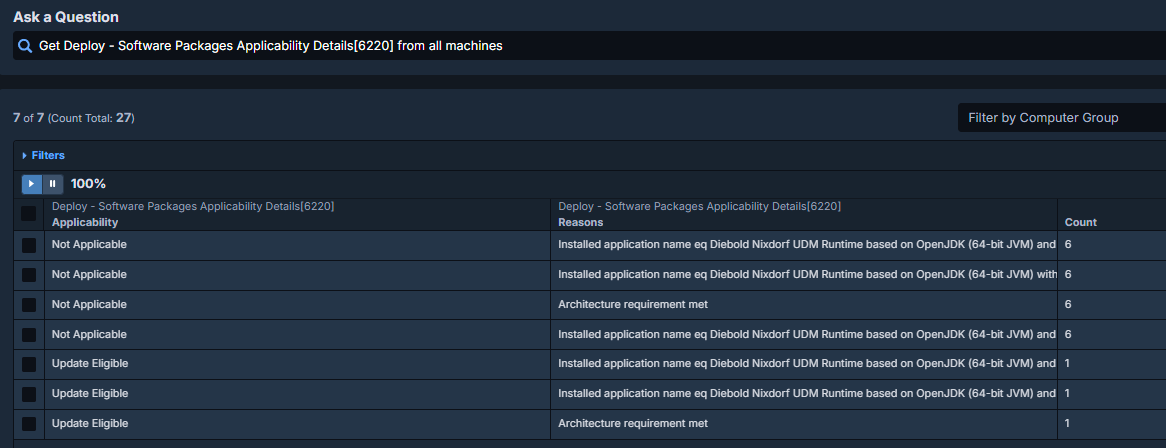
Step 3: To drill down on a specific device, add a filter to the query:
Get Deploy – Software Packages Applicability Details[6220] from all machines with Computer Name contains LABLTSC2019.monlab.lan

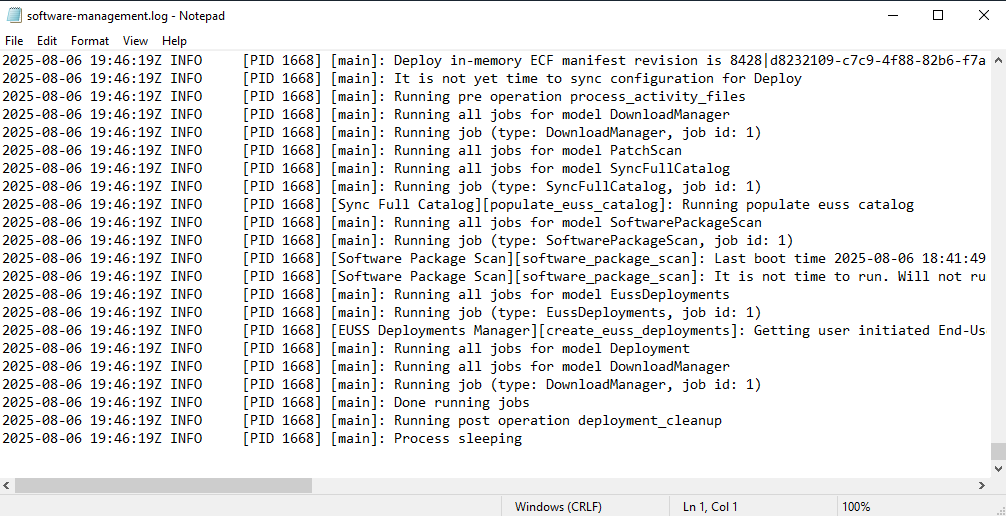
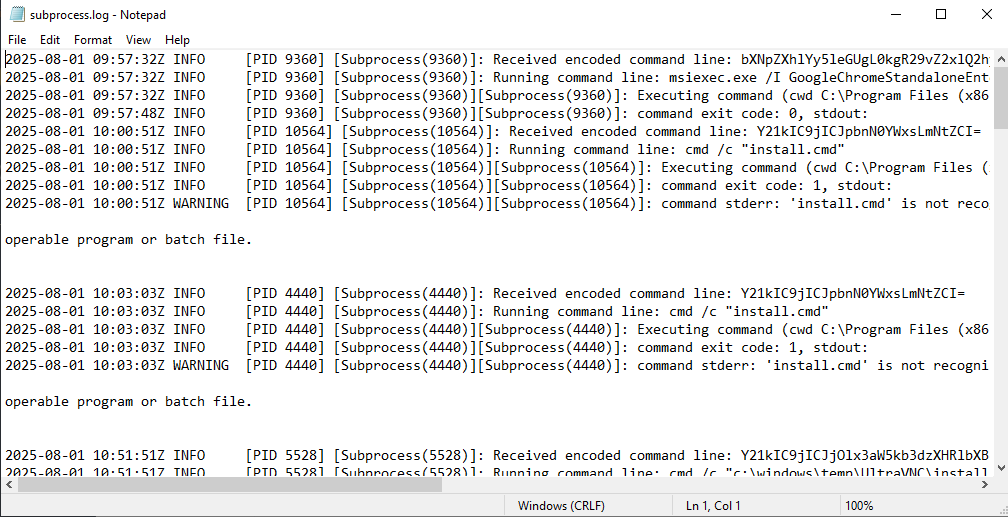
Log Files
For detailed troubleshooting, check the Tanium Client logs on target endpoints:
C:\Program Files (x86)\Tanium\Tanium Client\Tools\SoftwareManagement\logs
Key log files:
software-management.log – Main deployment activity log
subprocess.log – Installation command output and error details
Tips & Best Practices
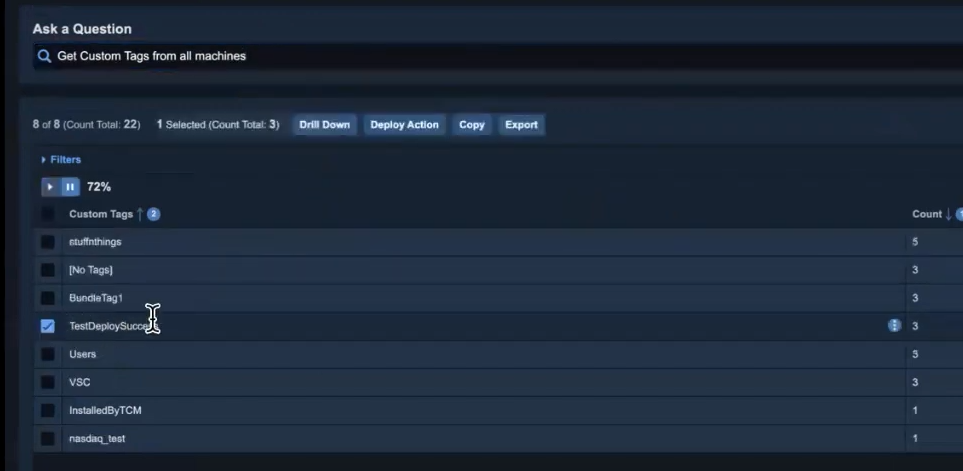
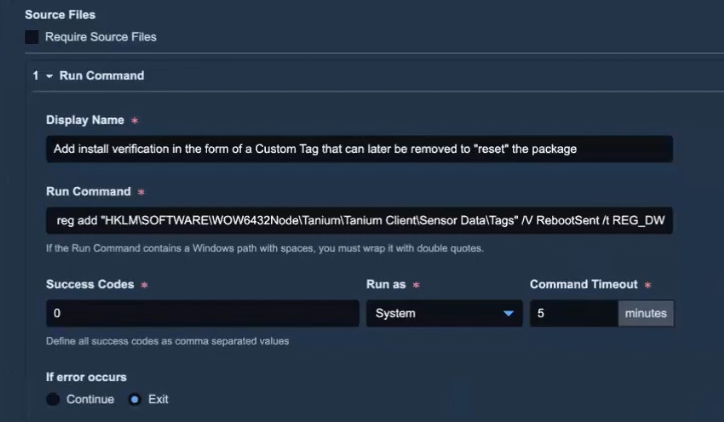
Track Deployments with Custom Tags
Apply a Custom Tag during installation to mark successfully deployed devices. This allows you to query and track devices post-deployment using Interact. For example, in your package’s Run Command, write a registry key or environment variable that indicates successful deployment.
Query Custom Tags: Once tagged, retrieve all tagged devices using this Interact query:
Get Custom Tags from all machine
This tagging approach is especially useful for compliance audits and verifying complete deployment coverage across your infrastructure.